Activities
Insert Activities without a Template
Activities can be inserted without using templates. In order to do this you use the following buttons in the Window functions:
 This button is used to insert a main activity on the row above. First you click the row above which you want to insert a new row. The selected row will then be highlighted in blue. Main activities must first have been registered under the Main activities tab.
 This button is used to add a main activity at the end of the list.
 This button is used to insert a sub-activity on the row above. First you click the row above which you want to insert a new row. The selected row will then be highlighted in blue. The window called Enter data for main activity will then open in which you select main activity and responsible, if any. Confirm by clicking OK.
 This button is used to delete the selected row. If you are deleting a main activity this message appears Are you sure you want to delete the main activity and all belonging sub-activities?.
Insert Activities with a Template
To the left of the buttons Add and Insert you can select activities in a drop-down menu when using activity templates. Then you insert or add the template by using one of the buttons mentioned above. The activity templates must first be created in the Activities procedure in the Global Settings module.
- Insert - requires that a main activity is selected since you cannot insert a template (that contains headers) in a list with sub-activities linked to a main activity.
- Add - an activity template will then be added at the end of the list.
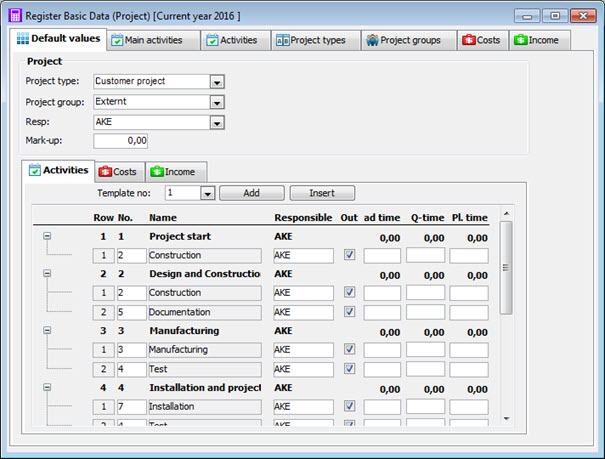
Examples of main and sub-activities.
Columns in the Table
Row shows the row number for main and sub-activities.
No. shows the activities that shall apply by default per project type. You must first register activities under the Activities tab.
You can enter a default Responsible person for each activity. You select the Responsible person from the list of registered Users in the system.
The M column indicates whether or not an activity is mandatory, this means that it will not be possible to delete the activity.
You can also enter the Status of the default activity. The available alternatives are Not started, Started and Finished.
For information about the other columns, please read the help section for the Activities tab.
Here you can also enter Lead time and Queue time for an activity. These times are entered in days. The queue time is defined as the "gap" between two activities expressed in days. If, for example, the queue time is two days, the start date of an activity must be two days after the end date of the previous activity. The queue time can be a negative value. Here you can also enter the Planned time in hours.
In the Print column it is indicated whether or not an activity shall be shown in the project report in the Register Project procedure.