Operations
In this box there is a table where you can create an operation list (routing) for the part selected in the structure.
It is possible to add, insert, and delete operation rows by using the buttons Add  (F5), Insert new row
  (Shift + F5), and Delete
  (F6) on the function menu.
Using the button Go to procedure  you can go to different procedures for the selected operation.
With the button Summarize reported times  you can show and update the operation's setup times and unit times with times from previously reported manufacturing orders. The Result tab shows a list containing details about the manufacturing orders which the summary is based on. You can select which setup and unit times should update the times of the BOM and routing. Operations on manufacturing orders are connected with the BOM and routing operation they should update by having the same work center and operation number. For a pool work center which always has different work centers in routing and on order, an operation ID is instead used as identifier.
It is possible to except/exclude operations which deviate too much from the normal, before you choose to save and update the BOM and routing.
The Selection tab
- Finish date of operation – Enter date interval for finish date of operation.
- Part status on order – This decides the part status on order.
- Minimum number of orders – Enter the minimum number of orders for the summary. The default value here is 1. If the number of orders are less than the entered minimum number, no summary will be made.
- Deduct planned setup time from reported time for operations without reported setup time – This setting is used if setup time is specified for the operation, but when you do not normally report it separately for the operation, but instead report int together with the unit time. The planned setup time will be deducted form the unit time and is presented as setup time. For operations where setup time have been separately reported, the reported times will always be left untouched.
- Update setup times by default – Determines if the column Update setup should be marked by default in the list.
- Update unit times by default – Determines if the column Update unit should be marked by default in the list.
- Only include finished manufacturing orders – Determines if only finished manufacturing orders (orders with status 4 or higher) should be included in the summary.
- Only include orders marked for mean price calculation – Determines if only orders which should get a mean price calculation will be included in the summary. In the Post-calculation procedure it is possible to uncheck this option for an order.
- Number of decimals – Determines the number of decimals. The default option here is 2 decimals.
The Results tab
By clicking the plus sign you see order data with information about reported time and the order's quantity. You can choose not to include certain manufacturing orders in the calculation of average time for the operation.
- Setup time – Current setup time.
- Average setup time – Setup time calculated as an average value of reported setup times for the operation.
- Difference setup time – The difference is calculated as: Average setup time – Setup time.
- Update setup time – Check this box for the setup times which should be updated.
- Unit time – Current unit time.
- Average unit time – Unit time calculated as an average value of reported unit times for the operation.
- Difference unit time – The difference is calculated as: Average unit time – Unit time.
- Update unit time – Check this box for the unit times which should be updated.
- The button Close and update operation times – This button updates the operations with new setup and unit times.
Warehouse (WH)
(Applies if you have installed the option Warehouse) If you change to another warehouse you will see the WH column. On the rows which belong to another warehouse than the selected warehouse you will see a symbol  in the column. A tooltip for the symbol informs you of which warehouse the row belongs to. Values and texts in all columns for these rows are displayed in italics.
In many of the procedures you can change the warehouse which you will be working in by using a button  in the toolbar of the procedure. It is also possible to generally change in which warehouse to work. Then it is changed for all procedures. This is done in the desktop backstage. In registration procedures for quotes, inquiries, different orders, and invoice bases, you can in a field select to which warehouse the record belongs.
Row
Here you can see the row number of the operation. For each row added, one will be added to the number in this column. The row number cannot be edited.
Operation number
The operation number shows the sequence in which the operations will be run. The first operation registered is given number 10, the next one is given number 20 etc. The operation number can be edited. You can use the same operation number several times in an operation list (routing). This is useful e.g. in alternate BOM and routing. However, you cannot use the same operation number several times on the same manufacturing order. An operation number must be entered, otherwise you cannot save the BOM and routing. When you save, the operation list will become sorted by operation number.
Work center
Here you see/enter the work center that will perform the operation. Work centers must first be registered in the Work center register procedure. The work center must be entered, otherwise you cannot save the BOM and routing.
If the selected work center is of the Subcontract type, a subcontract part will be created and linked to the operation when saving the BOM and routing. The subcontract part is the "data unit" in a subcontract, that is, you can update information for that part either from the subcontract or from the part register. The information updated for the subcontract part from the subcontract is supplier number (the part will get a supplier link to the supplier selected for the operation), supplier's part number, setup cost and unit cost, staggered subcontract prices and transport cost. The name of the subcontract part will by default be: "[part number of the main row] – [operation number]", for example "895-21 – 20". You can link to the subcontract part in the Part register by using the button Go to procedure in the box when you have selected the subcontract in question. In the part register you can then enter additional information about the subcontract part.
Operation name
Here you see/enter the name of the operation in this BOM and routing. For a new operation, the name of the operation is loaded from the selected work center but you can change it if you want to have a different name than the default. This field cannot be left empty.
If the name of the operation is changed in the BOM and routing and you later on change the work center of the operation, then the operation name in the BOM and routing will not become updated. The purpose of this is that it is possible to enter specific information for a certain operation via the name of the operation. That is why this information will not be removed if someone should change work center for the operation. The same function exists for manufacturing orders. If the name of an operation is changed for a specific order, then that name will only apply on that order.
Translations
By using this button you can enter translations of the operation name. By using the button Translations ![]() you can translate the text to the different active languages registered in the system.
you can translate the text to the different active languages registered in the system.
Supplier
If the row refers to a subcontracting work center, you will see the supplier number which is entered for the work center. It is also possible to change to another supplier in this field. By using the Lookup feature, you can search for suppliers of subcontractor type (subcontractors) in the supplier register.
Delivery address
If the row concerns a subcontracting work center you can, by using this button  , specify the address to which the subcontractor should send the goods after the work is performed. If you don't make a selection, then the Company alternative will be default, that is, the delivery address of the previous operation will be used. You can select another of the company's delivery addresses or another warehouse's delivery address. If the previous operation's warehouse is missing, then the delivery will be sent to the warehouse of the order. It is also possible to select a delivery address to Other customer or Other supplier.
If it is the final operation in the BOM and routing, you can select End customer on order instead. Then you shouldn't enter the address of a specific customer or supplier in the BOM and routing. The delivery address will instead be loaded from the linked customer order and be added on the manufacturing order. If no customer order is linked, the company's delivery address will be used instead. This dynamic solution can be applied if you deliver the same part to different customers.
Setup time
Here you can enter a setup time in the unit selected for the operation. The setup time is the operation time that is not dependent on the quantity. If you have entered a default setup time for the work center it will be shown here, but it can be changed.
You can also enter a setup cost, if any, for a subcontract if the row refers to a subcontracting work center. The setup cost is displayed in dark red.
Unit time
Here you can enter a unit time in the unit selected for the operation. It is the operation time that is dependent on the quantity.
If you in the column called Unit select any of the time units select quantity/hour, quantity/minute, or quantity/second, you can here enter the quantity of the part which is manufactured per selected time unit.
If the row refers to a subcontracting work center, you should instead enter the unit cost for the subcontract. The unit cost is displayed in dark red.
Cycle time
The cycle time![]() Cycle time is the productive time in the operation in which the unproductive time is not included. The shorter the cycle time, the greater the production rate. column is shown if the system setting Use cycle time and ineffective time in BOM and routing is activated. The column Unit time is grayed out when this setting is activated.
Cycle time is the productive time in the operation in which the unproductive time is not included. The shorter the cycle time, the greater the production rate. column is shown if the system setting Use cycle time and ineffective time in BOM and routing is activated. The column Unit time is grayed out when this setting is activated.
Unit
Here you select the operation's time unit for setup and unit times. If you change time unit here, you will see setup time and unit time for the operation in the new unit instead. The default time unit is determined by the system setting Time unit for setup and unit time for operations.
If it is a subcontracting work center, you will here see the company currency or the supplier’s currency instead, but it can be changed. The default selection, company currency or supplier's currency, is determined by the system setting Default currency for subcontracts.
Unproductive time
The ineffective time![]() Ineffective time is time which is necessary in the operation, but is not directly productive. column is shown if the system setting Use cycle time and ineffective time in BOM and routing is activated.
Ineffective time is time which is necessary in the operation, but is not directly productive. column is shown if the system setting Use cycle time and ineffective time in BOM and routing is activated.
Staggered subcontract prices
If the row refers to a subcontracting work center, you can enter staggered subcontracting costs under the button. You can enter the current price and future price for unit costs, depending on the limit value for subcontract part quantity.
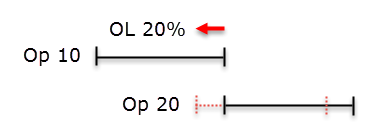
Overlap
In this column you can enter an overlap (OL) as a percentage. The definition for entering overlap is: “Quantity (%) left on this operation when the next operation should start”. For example, if operations 10 and 20 should overlap each other, you set the desired overlap as a percentage for operation 10. In the example, 20% OL has been set on operation 10. Is possible to set the overlap from 0 to 100%.
Queue time
Here you can see/enter the queue time for the operation. The queue time that you enter on an operation row here will override the queue time entered for the work center. The work center’s queue time is shown in the next column. If you leave this field empty, it is the queue time for the work center that will apply. Depending on whether you apply day planning or hourly planning, the queue time is shown in work days or hours. If either capacity via schedule or hourly planning is used, then you can enter queue time in number of hours with two decimals. Read more about Queue time in the Work center register.
Queue time, work center
Here you will see the queue time entered for the work center.
Fixed lead time
You can here enter a fixed lead time in whole work days. 1 day as fixed lead time means that the start and finish date will be the same day. 2 days means that the start and finish date will be the two days following each other. If this field is left empty, dynamic lead time calculation is performed as usual.
Only calculation
If you check this box, the operation will only be included in the calculation but not on the order. If you have material linked to an operation like that, the setting will also be activated for those materials.
Instruction (I)
Here you can see/enter an operation instruction. This instruction text will be printed on the manufacturing order documents.
This button opens a text editor you can use to write and format texts, insert images, signature, and hyper links, etc. When a comment/text exists, the symbol on the button will change from an empty speech bubble  to a filled speech bubble
  .
.
Files (F)
By clicking the Files button  , it is possible to link different files related to a comment or an instruction for the record in question. When the setting Automatic printout is available for activation, you can choose to get the linked file automatically printed. Read more in the topic General features about how to link files, automatic printout, and where linked files can be automatically printed. If there are linked files, you will see this symbol
  on the button.
Here you can choose if you wish to print linked files automatically together with the manufacturing order documents. You can also choose if a unique file (copy) should be created of the linked file on the manufacturing order and if the unique file should be allowed to be opened in an external program in Windows. Read more about Link files in the section General features in the online help function.
Configured instruction (CI)
(This applies if you have the option Product configurator) Here you can enter a configured operation instruction. If there is also a regular operation instruction (I), this will be combined with the configured operation instruction on the manufacturing order documents.
By clicking the button CI you open a window where you can create a configured instruction per configuration group you add. You can enter variables by using the mouse pointer to drag and drop to the places in the instruction text where you want them. You can also manually enter a variable in the instruction text as [v:variable code]. You can create formulas from the available variables and add the formulas in the instruction text using drag and drop. It is also possible to manually enter a formula in the instruction text as [f:formula name]. Validations are made to make sure the entered variables and formulas are available.
You can test the outcome by using the button Preview instruction  next to the instruction text.
Read more about configured instructions in the topic called Basic data in the chapter about using the Product configurator.
Alternative work center
You can determine in which alternative work centers an operation in the routing can be run, according to a certain priority. Under this button, you can enter work centers, the first alternative on the first row, the second alternative on the second row, etc. On the rows you can enter unit time, setup time, queue time, and exceptions for the staffing factors. You can enter subcontract work centers as alternative work centers.
Time formula f(x)
(This applies if you have the option Product configurator) In the f(x) column you find the button Time formula  . This button opens a window where you can add formulas for unit time and setup time for the operation row. When a formula already exists, the symbol on the button will be different
  . You can select one of three different functions for a time formula which will be taken into consideration when an order is registered for the part. It is possible to multiply, add, or replace the regular value with the result of the formula. Time formula also works for subcontracts. Read more in the section Formulas in Using MONITOR about the product configurator.
More info
Under the More info button , you can generally find additional columns. Below you find the online help topics for the columns.
Supplier's part number
If the row refers to a subcontracting work center, you can here enter the supplier’s part number. This will then be displayed on manufacturing orders, subcontract purchase orders, and subcontract delivery notes.
Number of machines per order
Here you can enter exceptions from the number of machines per order entered for the work center.
Setup quantity
Here you can enter a fixed overflow for the operation. The setup quantity can e.g. be applied when a number of "test run samples" or "setup rejects" have to be run in order to setup a machine for production. Setup quantity can be used as an alternative to, or in combination with Extra % on the operation row.
Extra %
Here you can enter a percentage for overflow of quantity. This can be used if it is more convenient to add a percentage rather than a fixed overflow.
Cost factor setup exception and Cost factor unit exception
Here you can enter cost factor exceptions for the operation in question. For setup time and/or unit time you can choose the regular cost factor or one of the exceptions for cost factors. These must be first registered for the work center.
Transport cost
If you have selected a subcontracting work center, you can here enter the transport cost for the subcontract, if any. The cost is entered in the company currency.
Staffing factor setup and Staffing factor unit
Here you can enter staffing factor exceptions for the operation. For setup time and/or unit time you can enter a staffing factor as a percentage that will override the staffing factor for setup time and unit time entered for the work center. This will be displayed in the Staff. fact. setup (WC) and Staff. fact. unit (WC) columns.
By using the system setting Staffing affected costs you can select the cost factors linked to the staffing. That way, the staffing factor will affect both the loading and the calculation.
Exceptions for staffing factors are not entered for subcontracts.
Staffing factor setup (work center) and Staffing factor unit (work center)
Here you can see the staffing factor entered for setup time and unit time for the work center.
Terms
By using different terms on operation rows (and material rows), you can apply alternate BOM and routing. The terms available are: Finish date, Quantity, Customer number, Order, Revision, Variant code, and Part status. You choose to apply a row with a term in one of the following ways in the BOM and routing:
- add this extra row (+)
- replace previous row (±)
- delete this row (-)
From
Here you can enter a "from value" of the selected term.
To
Here you enter the "to value" for the selected term. By entering a value in From and To you decide within which interval the operation row with the terms will be met.
Lead time
This field shows the lead time in number of work days for a subcontract. It determines the number of days needed for the subcontract. That is, the number of days between the start date and finish date. This field is empty if the row does not refer to a subcontract.
Net weight
Here you enter a net weight for subcontracts before they are sent to the subcontractor. The weight is also automatically saved in the Subcontract parts procedure. The net weight is used to obtain correct weight information for the subcontracts which are sent for wage processing to a country within the EU.
|
Feedback:
|
||

|
  
|