User interface
The user interface in the mobile client for Monitor ERP is adapted to smartphones and tablets. This means menus and buttons are larger, and easier to tap with your fingers. The interface is also responsively designed, ensuring the mobile client automatically adapts to the screen size of the device you are using, whether it’s a computer, tablet, or smartphone.
For smartphones and tablets, we recommend a minimum of Android 7 or iOS 12. For computers, we recommend a modern web browser which supports all functions in the interface.
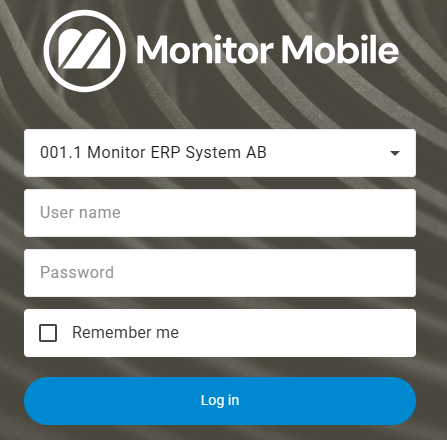
When you launch the Monitor ERP mobile client, a login page appears. Here you can choose the company to open, and enter the user name and password in the company selected. The next time you launch the mobile client, the company and user you most recently entered will appear in the login page by default.
If you enter the wrong password three times in a row when logging in, you must wait a while before you can try again.
Please note! Make sure that the password in the mobile client follows any password policy set for the company in the Security settings procedure in the Windows client.
If you want to log out, you cannot simply close the web browser. The previous session will remain active until you log in to a different device, web browser, or Windows client.
The login page is also shown after you have logged out of the mobile client. You can log out in the menu.
At the foot of the login page you’ll find the View licenses link. The link opens a page where you can see which third-party licenses are used in the mobile client. From this page, you can go back to the login page by tapping  in the top left.
If the company activates multi-factor authentication (MFA) for its users, there is an additional step when logging in whereby they must firstly register a device for MFA. For this purpose an authentication app must be installed on the device, such as Microsoft Authenticator or Google Authenticator. When logging in thereafter, users must always enter a code from the authentication app on the login page. Read more about MFA the section Logging in in the online help for the Windows client.
The home page contains the same desktop components that you have configured for use in the Windows client.
There is a home button  in the top left hand corner which is used to return to the home page.
The menu is used to start different procedures, configure settings for layout profiles and dashboards, select warehouse (which is an option), configure app settings (only in the app), configure user settings, open the online help, or log out.
The procedures are grouped by module. The procedures you have access to in the menu are determined by the permissions of the user and the warehouse selected. You can access the procedures for which you have user rights to Show or Update in the corresponding procedures in the Windows client (by selected warehouse).
You can show and hide the menu – this is controlled by the  menu button in the top left hand corner.
To the right of the menu you find the Message center button  . With this button you open a window where you can chat with other persons in the company and you can also show and modify information for your activities.
If you have received a new chat or a new activity/task (with today's date as planned date), a red symbol with an exclamation mark will be shown  on the button for the Message center. This is to make you aware of the new activity.
Monitor chat
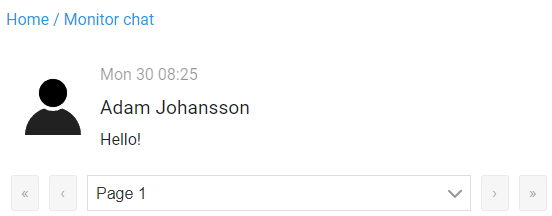
When you tap the Monitor chat button  a list of all your chats will open.
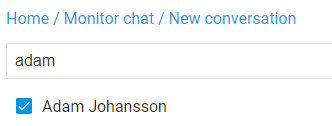
You can then choose to start a new chat or to reply in a chat you are already taking part in. You start a new chat by tapping the Start new conversation button  and then you select one or several recipients in the list and tap on Start conversation. If you have existing chats you will also find a search field at the top of the list where you can search for users to send to.
When you start a new conversation or when you open an existing chat, there is a text editor where you can type your message. In the editor you can format your text and add line breaks, etc. You can also enter hyperlinks and upload, send and receive images. You send your messages by tapping the arrow button to the right in the editor.
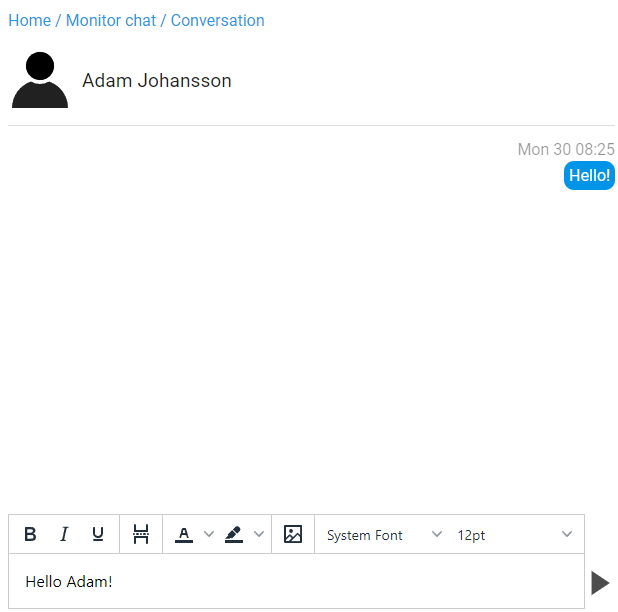
On units that have small screens, some of the formatting options will be hidden by default. To see all formatting options in the editor you can tap and hold at the same time as you scroll left.
To be able to start new conversations the user has to be tied to an employee number in the Personnel records – General procedure in the Windows client and must also have the setting called Permission to start new chat activate in the same procedure. The Allow login to mobile client setting found under the Security tab in the Users procedure, also has to be activated.
Activities
Under the Activities button  you see your activities. Above the list of activities you can also Show finished activities and set a Time horizon a number of days ahead. Click the info
  button to open a dialog box where you can change the name, person responsible, and time of an activity. Tap the download button
  in the dialog box to download a calendar record for the activity as a file (.ics), which can be added to the calendar in your computer.
If the EIM (Electronic Invoice Management) option is activated, as a signer, you can see the invoices that have been sent to you for approval. By clicking the  button, the invoice opens in Authorize invoice. If there are invoices to authorize, a notification is shown in Message center.
The Find field, in the top right corner of the mobile client, has the same function as Monitor search in the Windows client. It is used to perform exact match searches for data records, in the same way as in the Windows client. Read more about Find in the mobile client.
To configure your user settings, tap the User settings button to the right of the search field and under the menu. You can select a language as well as the procedure that starts automatically. You can also enter e-mail address and change password. Read more about User settings in the mobile client.
When a procedure or function is open, a “breadcrumb” is shown at the top of the page in the mobile client. This shows the section of the procedure you are working in. You can navigate back and forth, all the way to Home, by clicking the link to the left in the breadcrumb.


