Create Reports in Crystal and MONITOR
Here you find a step-by-step description about how to create a new report in the Custom Reports module in MONITOR.
Create Report
- Create the report in Crystal Reports and save it on the network, preferably in the folder Monwin\Crystal\Custom.
Create Search Form
- Open Global Settings - Printers / Users - Menu Text.
- Expand the section Custom Reports.
- Create a menu item by entering a Name for the report in the chosen location 1-20 under the wanted section: Manufacturing, Purchase, Sales, Inventory, Accounting, Workshop Info or Global Settings.
- Save and close.
- Open Global Settings - Printers / Users - User Rights.
- Go to File - Update System and restart MONITOR.
- Open the new menu item in the Procedure menu and press Ctrl+Shift+O in order to see the Procedure-ID (a five-digit number starting as of 10001). Make a note of this number.
- Open the Custom Reports - System - Create Search Form.
- Enter the number that you made a note of in the first field called Procedure ID (the name you gave the report should then be displayed in the Name field).
- Check the check box called Crystal Reports?.
- Enter the desired selection rows from the field RID in the table.
- Enter the file path and file name to the Crystal Reports-file (.rpt) in the File name Crystal Report for every selection row (it will suffice to enter only the file name if the file is located in the Monwin\Crystal\Custom folder).
- Save and test the Search Form by opening the menu item again from the Procedure menu.
Own Parameters for Reports
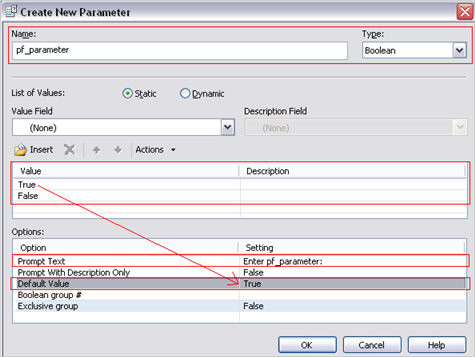
- Create parameters in reports in Crystal Reports by right-clicking in the Field Explorer in the Parameter Fields.
- Then select New, name the parameter and click OK.
- The Formula Workshop is opened, there you should select to Save.
- You can enter Default Values, see image below. First add to the list and then you make a selection in the lower section. An explanatory text is displayed for the parameter in the search form.