Scheduling a MEDI Run Using Scheduled Tasks
You can also schedule times when MEDI should run, if that is more suitable to your work flow. During automatic runs a new export file is always automatically created which then only contains the information that has been saved to EDI Data at that time and for that particular format. For example, for each approval of an EDI Invoice, MEDI is run and a new export file is created with just that particular invoice.
When you schedule the task, you have the opportunity to increase the information that is saved to EDI Data for that format, for example several invoices to the same customer, that MEDI will later export to the same export file.
There is an icon in the Control Panel in Windows called Scheduled tasks. There you can configure tasks for different programs that will run on different occasions, for example for MEDI.

Scheduled tasks in the Control Panel.
There is a guide in the Scheduled Tasks procedure called Add scheduled task that can be used to create tasks. This is how you do to add a task for MEDI:
- When you have started the guide you have to use the Browse... button in the second dialog box in order to find the Monwin\Tools folder where the MEDI program is located.
- Then you enter a name for the task (by default "medi") and select an interval for when the task should be run. There are different alternatives, whether to run the program daily, weekly, monthly etc.
- Select the start time and start date when you wish the task to run. There are also other interval selections you can make here that depend on the selections made in the previous dialog box.
- Then select a user in the domain and enter a password to run the activity. The user should be a user in MONITOR who has the right to run MEDI and who has the right to create and delete import and export files on the server in the folders indicated in EDI Links.
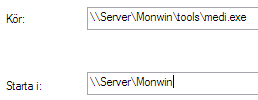
- In the final dialog box you should check the "Open advanced properties for this task when I click Finish" box. In the dialog box that appears you should change the Start in field so it says Monwin and not Monwin\Tools that is otherwise selected by default (see image). The reason for this is that MEDI has to start in Monwin so that the program can find the mconnect.dll file in order to connect to the database.
Alternatively, you can also change the Start in field at point 5 afterwards, then you do it by right-clicking on the new activity in Scheduled Tasks and select Properties.
 In the example above the computer is called Server, where MONITOR is installed, but of course it can be called something else.