Creating Test Company or Historical Database
Instruction on how to create a test company or a historical database
- In order to create a test company or a historical database in your system you should in Windows on the database server select Start - All Programs - MONITOR ERP System - MONITOR System Upgrade.
- In the
 dialog box that is displayed you should select the alternative Add new test- or historical company. Then click Next >>.
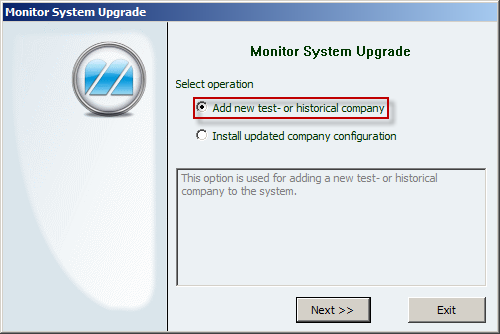
Available options when adding test company or historical database.
- The database update tool starts and then you should select the company on which you wish to install a test company or a historical database in the dialog box Selections for new test company or historical database.
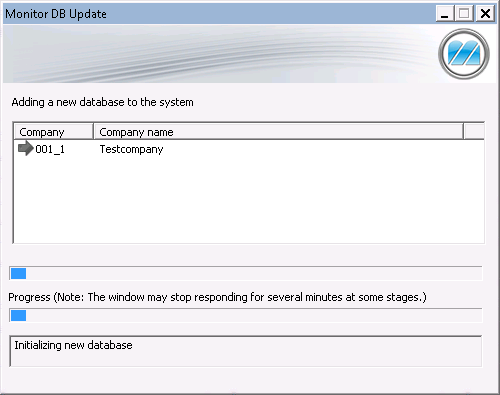
The database update tool.
- In Type of company you should select whether it should be Test or Historical ("Test" stands for test company and "Historical" stands for historical database).
- If you select Test you can then under Type of database select which database to install: Empty or Browse... for database file.
- You can then add information in the corresponding text field, after the text "Test company" or "Historical".
- Then click OK in order to create the selected test company or historical database. Now the database update tool creates the new database.
If you selected an Empty database for the test company it is now ready to use. You open the new company database by starting MONITOR and going to File | Change company... in the Window menu.
If you want a test company which contains basic data taken from the actual company, then you can follow item 1 in the instruction below. This can be done if you chose to create an Empty database for a test company. If you want a test company that is an exact copy of the actual company you should instead follow the second instruction further down in this section. To update the test company regularly with more recent data from the actual company you should follow the third instruction below.
 Please Note! Do not forget to change set of forms in your test company! It should not be the same set of forms as you are using in an actual company! If you use the same set of forms in the test company as in the actual company and you make changes in form settings, then these changes will also affect the actual company!
If you selected Historical, that is, to create a historical database you should follow the first instruction below.
Instruction for Historical Database or Test Company with Basic Data
- Go to the Historical Registers procedure under Global Settings in MONITOR and select the historical database in question. Select that All tables should be synchronized (if a previous synchronization has already been made for all the tables, you can select a single table to synchronize). Then click Save to start the synchronization.
- Go to the Purging Procedures under Global Settings and under the Purge table tab you should select the table to purge and enter up to and including which date the table should be purged. In the Records that are moved tab you can see which records that will be included. Then go to the Historical database tab and select the historical database in question. Save in order to start the purge. Repeat the procedure for each table you wish to purge in the actual company and move over to the historical database.
Instruction for Test Company as Copy of the Actual Company
- Open the Explorer in Windows and open the actual company's backup directory (e.g. 001) under the directory \Monwin\DBBackup\.
- Copy the database files monitor.db and monitor.log from that directory to the test company's log (e.g. 001_1) under \Monwin\Db\ and overwrite the existing files there.
Please Note! Make sure that you copy the database files to the correct directory mentioned in item 2 above!
Instruction on How to Regularly Update Test Company with Recent Data from the Actual Company
- On the database server you should start the MONITOR Backup under the MONITOR program group in the Start menu in Windows.
- If MONITOR Backup starts a wizard you should select the Advanced alternative and then click Execute (if there are more than two work items configured, the Work list will be displayed instead of the wizard/guide from start).
- In the Work list, double-click on Add work...
- Select the Advanced option and click Execute.
- In the Settings tab which is then displayed you enter a work name and select if and how the event logging should take place. Enter a schedule for time and days that the work should run. In most cases it is best to have a local system account to run the work, but you can also enter another account in Windows. Also choose to create/update scheduled task for the work item (you can then find the task under Scheduled tasks in the Control Panel in Windows).
- Do to the Backup tab and the Validation tab and deselect Active under both tabs. It is only a copy that will take place in this work item.
- Then go to the Copy tab and check the Active option check box. You should now select the test company under that tab and finally click OK to save the work item.
 An alternative method is to activate the copy of an actual company to a test company in the same work item which performs the backup of the actual company. In that case no separate copying work item will be created in MONITOR Backup. Read a description of MONITOR Backup.