My Windows / AutoStart
 My Windows / AutoStart is a window divided in two where you in the left portion can select procedures to configure as shortcuts in the My windows toolbar. It is handy to have shortcuts for the procedures that are used the most. You can also select procedures for AutoStart, which means that they will open automatically when you start MONITOR. To use AutoStart is very convenient if you mainly work in one particular procedure.
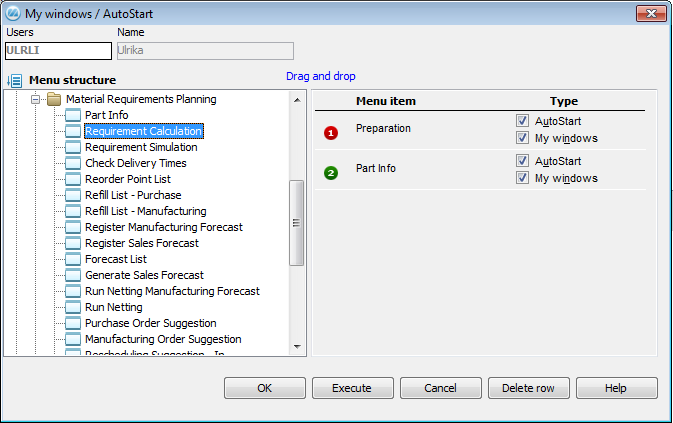
My windows / AutoStart, with a few procedures configured as shortcuts.
If you use MONITOR in a multi-user environment, you can only create shortcut keys or configure AutoStart for procedures in which you have user access/rights. However, in a single-user system you can configure shortcut keys for all procedures.
Users
If you have administrative rights, you can here select a MONITOR user for whom you wish to configure a procedure shortcut or AutoStart. Once you have loaded the user in question, the user's name and group affiliation is shown in two information fields to the right of this field.
A regular user cannot select another user in this window. The field will only show the name of the current user, and it is greyed out.
Menu Structure
Under Menu Structure you select the procedures that should be setup as shortcut keys, or added as AutoStart to open them automatically when MONITOR is started. You can use the "drag and drop" function, double-click or press Enter to transfer a procedure to the right part of the window, called Menu item.
Menu Item
Under Menu item you can see the procedures that have been setup as shortcut keys or added as AutoStart. If you want to remove procedures from the shortcut keys or AutoStart, you can either use the "drag and drop" function or click on the button Delete row.
Type
Under the Type heading you can select if the procedure should be included as a shortcut key in My windows or an AutoStart, or both.
- My windows – is the standard default. The procedure will then be placed in the My windows toolbar.
- AutoStart – choose this alternative if you want the procedure to be added as an AutoStart procedure.
The Delete Row Button
If you use the Delete row button, the selected menu item will be removed from the list in the right section.
Setting up Shortcuts
- Go to Settings | My windows...
- Select a user (only administrators can select users) for whom the settings will be configured.
- If procedures already exist under Menu item, you should check My windows under Type for the procedures that should have shortcuts.
- Save by clicking Execute or OK.
- If there are no procedures under Menu item, select the procedure you want a shortcut for under the Menu structure heading in the left part of the window. To transfer a procedure to the Menu item part on the right, press Enter or double-click on the procedure. You can also use the "drag and drop" function with your mouse pointer.
- Check the My windows checkbox under Type for those procedures you want as shortcuts.
- Save by clicking Execute or OK.
The shortcuts are displayed by default with a number icon in the corresponding module color, and will be numbered in chronological order. A separation is automatically inserted between shortcuts that belong to procedures in different modules. The shortcut icons can be replaced by any image file.
Setting Up Procedures as AutoStart
- Go to Settings | My windows...
- Select the user for whom you will configure the settings.
- If the procedures already exist under the Menu item heading, check the AutoStart box under Type for the procedures that you want to add to AutoStart.
- Save by clicking OK.
- If the procedures are not available under Menu item, select the desired procedure under the Menu structure heading in the left part of the window. To transfer a procedure to the Menu item part on the right, press Enter or double-click on the procedure. You can also use "drag and drop".
- Check the AutoStart checkbox under Type for those procedures that you want to add to AutoStart.
- Save by clicking OK.
Changing Shortcut Icons
- Go to Settings | My windows...
- Select a user (only administrators can select users) for whom the settings will be configured.
- Double-click on the digit icon (number icon) under Menu item, and the Select icon window will open, allowing you to choose from a number of pre-defined icons.
- You can also select an image file from another location. In that case, click the Other... button in the Select icon window to browse for another image file. The file should be of the following formats: .ico, .bmp, or .png, and its size should be 16x16 pixels.
- Save by clicking OK.