
Open the Scan Supplier Invoice procedure under the Accounts Payable menu in the Purchase module. The window below will then be displayed.
The Scan Supplier Invoice window.
Set-up
There are two options depending on which type of scanner you are using. If you use a scanner with a sheet feeder, you place the invoices in the feeder, otherwise you must place them on the flatbed one by one, that is, handle them manually. Under Source you select if you will be scanning with a Manual or Sheet feeder scanner.
If you select Sheet feeder, you must indicate if any of the invoices contains a differing number of pages. If all invoices just have one page, you enter 1 under Pages / invoice: If, on the other hand, all invoices have the same number of pages like 2, 3 or more, you enter the applicable number here. If any of the invoices contains a differing number of pages, you must sort them by the number of pages. For example if some invoices contains two pages and some three pages, you enter 2 and scan the invoices with two pages. Then you enter 3 and scan the invoices with three pages.
Settings
In normal cases the settings in this section are automatically configured as they should be. However, you can make changes if necessary. Under Scanner you can select which scanner that should be used. The driver and the scanner have to be locally installed on the computer.
Under Color you select if you want to scan in color, black & white or grey scale and under DPI you select the desired resolution of the image. Under Inbasket, you select to which inbasket the invoice files should be scanned. The inbasket is a folder on the computer or on the server hard drive that has been defined under the Electronic Invoice Management heading under the Purchase tab in the Settings procedure. You can also select between two alternative file paths. Under File prefix, you enter the file prefix for the scanned files. The file prefix MX is entered by default, but can be changed.
Scan
When you are ready to scan, click Scan to start the scanning.
![]() When you scan in this procedure, the files are saved in TIF format.
When you scan in this procedure, the files are saved in TIF format.
If you always use the same settings for the scanner, it will never be more complicated than this. But if you want to change the scanner settings you just select Show scanner set-ups and click on Scan to change the settings for the scanner. Here you can change resolution, contrast, paper size, etc.
Show Scanned
When the scanning is completed, click on the Show scanned to view the invoices. Then you can see if adjustment or rescanning is needed.
The Show scanned window
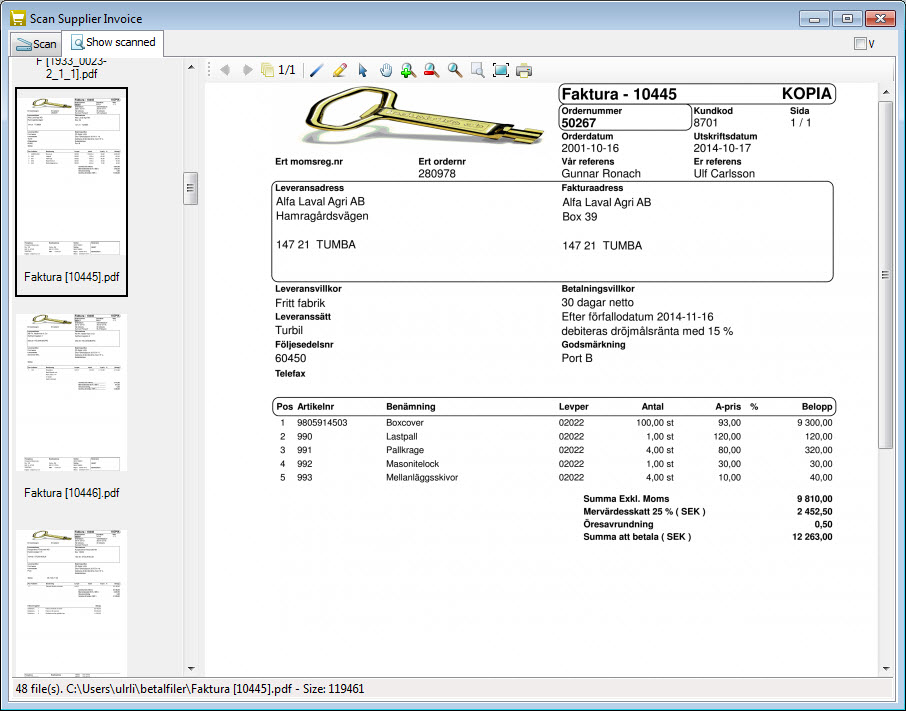
A window will then open displaying all scanned invoices as thumbnail to the left. To view them in a larger format, you just select one by clicking. At the bottom of the window, you can see the file name and file path for the image in question.
In the toolbars there are buttons that you use for different activities in the invoice image. If you want to delete a scanned image, click the Delete button under the Window functions. If you by accident have scanned the invoice upside-down, use the Rotate function under the EIM menu in the Window menu. You can also zoom in on the invoice, draw lines, highlight an area and print in the toolbar above the invoice. Read more about the different tools under the section Window functions.
![]() You can drag on the frame between the sections to change the width of the sections. You can use the scroll wheel to scroll up/down the invoice image.
You can drag on the frame between the sections to change the width of the sections. You can use the scroll wheel to scroll up/down the invoice image.
Replace Invoice
It is possible to replace an existing invoice image with the image that is selected in the Show scanned tab. This is very useful if you e.g. have saved a wrong image to the invoice in connection with the registration of the invoice. This function is also handy if the invoice image for some reason has become corrupt and you need to replace it.
Select the image that should replace the existing invoice image. Click Replace invoice under the EIM menu - Add/delete document. The window below will then be displayed:
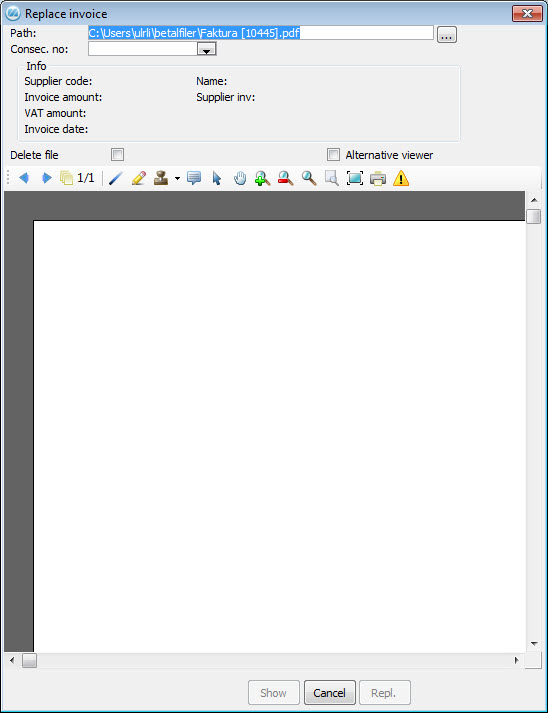
The Replace invoice window.
At the top of the window you will see the path and the file name for the image that was selected in the previous window. However, it is possible to change the file path and the file name. This is easiest done by using the browse button to the far right. The file types TIF and PDF are managed.
Then enter the consecutive number in the Accounts Payable that will have its invoice image replaced. When you have entered the consecutive number you will see information about the invoice in the Info section. Check the Delete file check box if you want the file to be removed from the hard drive afterwards.
If you wish to display the image saved for the entered consecutive number, click on the Show button. The image shown is the one that will be replaced. Finally, click on the Repl. (Replace) button.
It is also possible to add a scanned image to an existing invoice. This can for example be a delivery note, customer order, purchase order, etc. Read more about these functions in the How to Use Extra Document Types chapter.