The Production Calendars Window
The Production Calendars window consists of three portions:
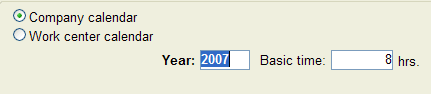
An  upper portion where you choose whether to create a Company calendar or a Work center calendar. Here you also indicate the of the calendar you are creating.
For company calendars, you can enter which is a value for working hours (production time) per day, in order to see which hours the calendar will generate per week, month and year. Basic time is a term used for work centers.
For Work center calendars you can select a , in order to load information from the work center register, for example basic time, shifts and capacity factor. These factors are important factors of the calendar.

The upper portion of the Production Calendars window.
The lower left portion consists of the actual calendar, which shows all days per month, in which you can enter the and . The number of shifts appears in the far left column, you can only enter one value per week. The capacity factor is the value that is entered for each day (per day).
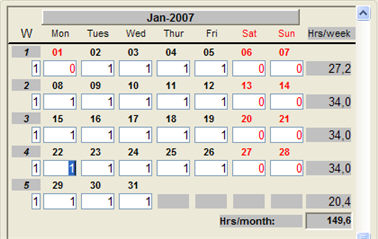
The lower left portion of the window.
The lower right portion shows a total sum of the capacity in hours (per month and per year). Here you can navigate between the months in each calendar year. By clicking on the month you want to view, that calendar will be shown in the left portion of the window.
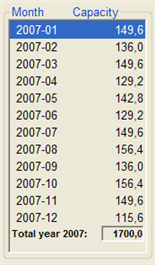
The lower right portion shows a total sum of the capacity.
Factors Used in Calendar
There are two factors that can be entered in a calendar.
In a calendar, these factors can be used to describe the capacity in calendar time. Then you should set the Shifts factor to 1 and the Capacity factor to 0 for the work centers in question in the Update Work Center procedure. Read more about the work center capacity in the Help Function for that procedure, under Basic time.
If these factors are used to describe capacity as a so-called "permanent value", they should only be entered in the work center register. That means that they do not have to be entered here in the work center calendar. Information about the capacity factor and shifts registered for a work center appears at the top of the window.
Creating a Company Calendar
- If you are creating or modifying a Company calendar, select this option
Company calendar options.
- Enter the Year and the Basic time. The holidays that are loaded to the General Calendar procedure are shown in the Holidays for field. Then use the Tab or Enter key to load the calendar into the window. If you open an existing calendar, the text Company calendar exists will appear in the top right corner of the window. If no calendar exists for that year, the text will say New company calendar.
- Once you have loaded a calendar for that year, all the days per month will appear in the lower left corner of the window. By default, the capacity factor is set to 1 on weekdays and 0 on weekends and holidays (non-working days).
- Make any necessary changes and save the company calendar by using Save either in the Window functions or under File.
 Please Note! The factor Shifts in the left column will also appear in Company calendars, but is not used there.
Creating a Work Center Calendar
- If you are creating or modifying a Work center calendar, select this option
Work center calendar options.
- Select Work center and Year. Then use the Tab or Enter key to load the calendar into the window. The Name, Capacity factor and number of Shifts will be loaded from the work center register in the upper part of the window. If you open an existing work center calendar, the text Work center calendar exists will appear in the top right corner of the window. If no calendar exists for that year, the text will say New work center calendar.
- Once you have loaded a calendar for a work center, it will inherit all the factor values from the company calendar.
- Make any necessary changes and save the work center calendar by using Save either in the Window functions or under File.
Please Note! Only the exceptions from the company calendar values are saved in the work center calendar. These exceptions will be highlighted in blue font in the calendar.