Installation of Printer for Printing of STE Labels
Below you will find an instruction concerning installation and sharing of label printer for transport labels.
Guidelines and Recommendations
- If the printer has USB port you should connect it to a computer or to a print server in the network in a suitable location, for example at the loading. If the printer has an Ethernet port you should instead connect it to a switch.
- If the printer is connected via USB port to a computer then you must install the driver in Windows on that computer. The printer should always be connected to the same physical USB port on the computer.
- If the printer is connected to a print server or to a switch in the network, we recommend that the driver is installed on MONITOR's database server. But the device driver can also be installed on another suitable computer/server in the network. It is a requirement that the computer, where the driver is installed, can never be turned off when users in MONITOR need to print transport labels.
- The printer should be installed as a local printer in Windows and then shared so that others in the network can access it for use. You only need to perform this installation on one (1) computer/server.
Installation of Printer Connected to Computer
- Use the Start button in Windows and then select Devices and printers.
- Select Add a printer.
- Select Add a local printer.
- Select Use an existing port and one of the LPT1 to LPT3 alternatives.
- Select Manufacturer Generic and Generic / Text Only as Printer.
- Name the printer. It can be a good idea to name the printer after its brand or model name.
- Select to share the printer and assign it a suitable Share name. The name that you gave the printer in the previous step is default but we recommend that you use a short name that is easy to remember, for example "Zebra".
- You do not have to select if the printer should be default or not, instead you should choose to finish the installation.
Installation of Printer Connected to Print Server or Switch in Network
- Use the Start button in Windows and then select Devices and printers.
- Select Add a printer.
- Select Add a local printer.
- Select to create a new printer port and then choose Standard TCP/IP Port.
- Enter IP address for the print server/printer.
- Now the IP address selected in the previous step will be used. Then select Manufacturer Generic and Generic / Text Only as Printer.
- Name the printer. It can be a good idea to name the printer after its brand or model name.
- Select to share the printer and assign it a suitable Share name. The name that you gave the printer in the previous step is default but we recommend that you use a short name that is easy to remember, for example "Zebra".
- You do not have to select if the printer should be default or not, instead you should choose to finish the installation.
Subsequent Sharing of Printer
- If you did not share the printer at the time of the installation you can do it afterwards. Select Printer properties when right-clicking on the printer in the Devices and printers in Windows.
- Select the Sharing tab, select the Share this printer alternative (if this has not already checked) and enter a short Share name that is easy to remember, for example "Zebra".
Settings in MONITOR
- Add the printer on a new row in the Printers procedure under Printers / Users in the Global Settings module in MONITOR. Enter a suitable name and enter the UNC file path and Share name to the shared printer in the Drivers / Windows printer field. Then you should save the settings made in the procedure.
The Port field will be empty and the symbol to the right will be red. The reason that the symbol is red is that MONITOR cannot detect the printer's driver in Windows, but in this case this is OK since the users should not install the printer on their computers.

Please Note! It is important that the UNC path is correctly entered in the procedure. You can add the printer in the Printers procedure in MONITOR on any computer.
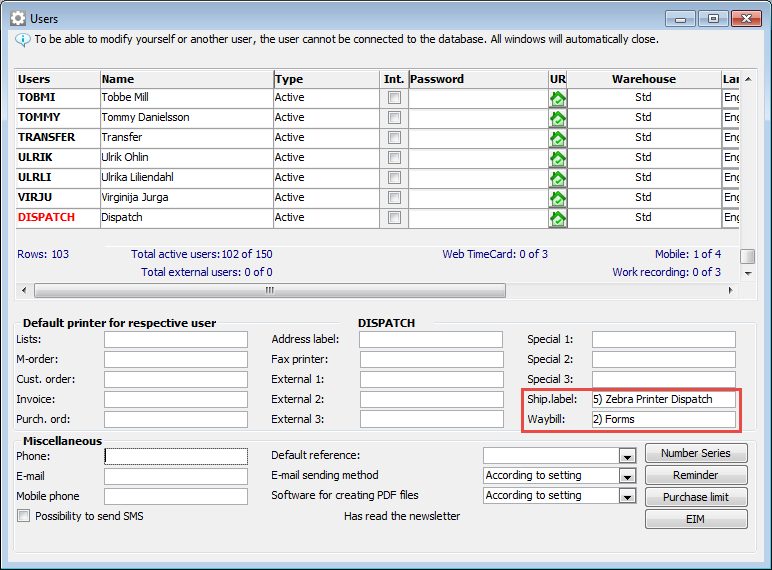
- Then you should select this printer as default printer in the Ship.label field in the Users procedure in MONITOR. This should be done for the user/users that should print transport labels. You can also configure a default laser printer in the Waybill field so that this also will be selected by default when the user prints the SIS or CMR Waybill.
- Start the Settings procedure, found under General in the Global Settings module. Select the Sales tab and scroll down to the Shipping section. Check that the Zebra STE (PSI) has been selected in the field Type of shipping document printer.

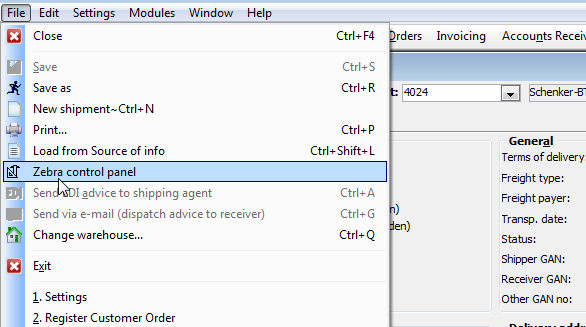
- Finally, start the Print Shipping Documents procedure, under Order in the Sales module. Go to the File menu and select Zebra control panel...
- Check that the UNC file path to the label printer is shown at Port and that Zebra STE (PSI) is shown at Type. Then press the Transfer format button under Zebra LP2844-Z / DA402 / S600 / Z4Mplus. (If you have an old label printer that does not have a flash memory you should instead click on the button under Zebra Stripe 500. However, these are not commonly used nowadays.)
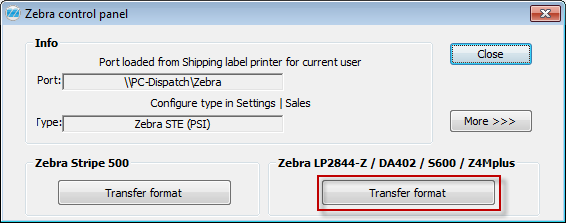
When the formats have been transferred and the indicator on the screen is no longer lit you should wait 1-2 minutes in order for all data to be saved in the printer (and so that the data light, if any, on the printer is no longer lit).
Now the printer is ready to be used from the Print Shipping Documents procedure. You should now configure the settings for shipping management in order to make shipments.
See also:
Troubleshooting - Printing Transport Labels