To open this procedure manually, go to the Purchase module and in under the Accounts Payable menu. There you will find the Authorize Supplier Invoices procedure.
When you open the procedure, you will see the first invoice to be authorized. You can authorize the invoices in whatever order you like by selecting a consecutive number. You can also use the navigation buttons in the Window functions to scroll to the next/previous and first/last invoice.
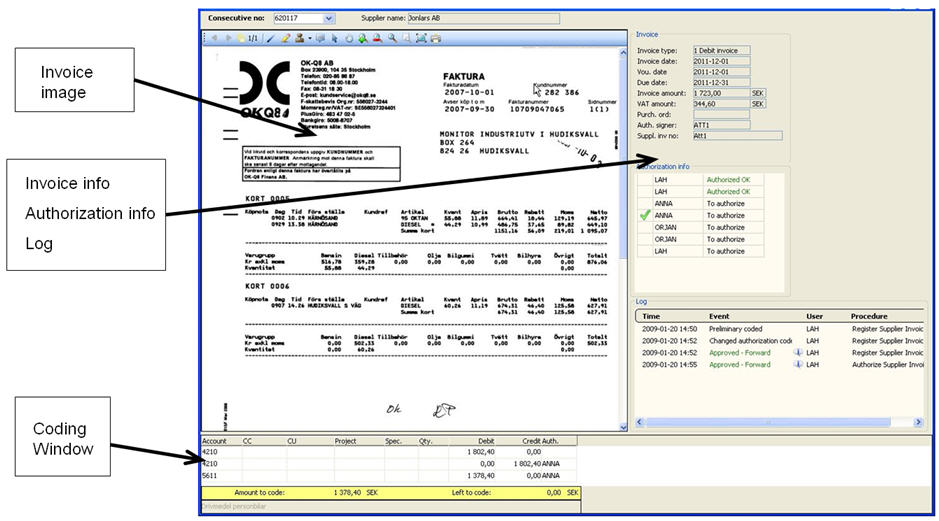
Authorize Supplier Invoices, with an invoice loaded without a preliminary link to a purchase order.
The procedure window consists of different portions. At the top left portion of the window you will see the Consecutive number of the invoice in question. You can load another invoice waiting to be authorized using PopUp by pressing F4. To the right of the consecutive number you will see the name of the supplier. To the far right you will see Document type if there are additional documents to the invoice. Via this field, you can choose to show these documents.
One part is the actual invoice image. To the right of the invoice image you will see invoice info, authorization info and a log. Below the invoice image you will see a coding window where you code and authorize the invoice rows.
![]() You can drag on the frames between the sections to change the width/height of the sections. You can use the scroll wheel to scroll up/down the invoice image.
You can drag on the frames between the sections to change the width/height of the sections. You can use the scroll wheel to scroll up/down the invoice image.
Invoice Image
You can change the size of the invoice image. You can enlarge the invoice window or use the zoom functions in the toolbar in order to make the invoice image easier to read. You can use the scroll wheel to scroll up/down the invoice image.
There are also different functions in the toolbar e.g. to add stamps and annotations (Post-it notes) on the invoice image. Read more about the different tools under the section Window functions.
The Invoice Info
In the right portion of the window you will find invoice information. At the top under Invoice you will see information such as invoice type, invoice date, voucher date, due date, invoice amount, VAT amount and currency, purchase order number, authorized signer and supplier invoice number.
Under Authorization info you will see the user name of the signer/signers that shall authorize and have authorized the invoice. The current signer is marked with a green mark. You can also see the suggested action to be taken by the signer and which actions the previous signers have taken, e.g. if the invoice has been forwarded or has not been authorized.
Under Log you can see the date and time of the different actions that have been taken for the invoice.
The Coding Window
In the lower portion of the window you can code and authorize an invoice.
Account/Authorize - without purchase order:
In this tab you code and authorize the different rows on the invoice. However, it is possible to approve an invoice and send it without coding the invoice. In that case you only have to click on the Save button in the Window functions in order to approve the invoice in question and then the next invoice is displayed.
However, if you want to code and authorize the invoices on row level, you must fill in the coding window and authorize on every row. Assume that the invoice is okay and that you want to code and authorize. First, you must choose an account. Place the cursor in the Account field. If you know what account number to use, you enter it here. If you do not know the account number, you can use PopUp by pressing F4 in the chart of accounts. If account profiles are used, you will only see the accounts that you have access to use for coding. The fields CC, CU and Project can be filled in if the account has been configured to manage sub-objects. Here too, you can press F4 to use PopUp. In the Spec field you can enter an additional text comment for the row.
You either enter the sum you wish to authorize for the row in the Debit or Credit field. The credit amount is normally entered since it is a credit invoice.
![]() It is possible to have the remaining amount automatically entered without typing the amount manually. For this function, use the plus key (+) in the Debit or Credit fields. The remaining amount will then be automatically correctly coded.
It is possible to have the remaining amount automatically entered without typing the amount manually. For this function, use the plus key (+) in the Debit or Credit fields. The remaining amount will then be automatically correctly coded.
At the end of the row in the Auth. field you enter your authorization signature. You can enter your authorization signature either by double-clicking in the field or by pressing the plus key.
When the coding row is completed, press Enter. If you have several coding rows to enter you do the same as above. You can also delete a coding row by clicking on Delete in the Window functions. After that, click on Save to close the invoice and display the next invoice on your screen.
Account/Authorize - based on purchase orders:
The appearance of the coding rows is a bit different if the invoice in connection with the registration was preliminary linked to a purchase order.
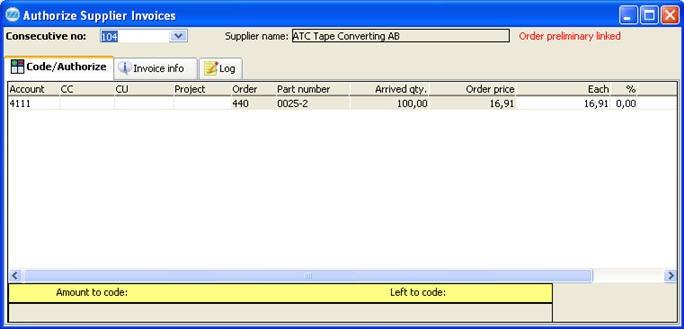
Coding rows on an invoice with a preliminary link to a purchase order.
Accounts with any coding dimension, Order number, Part number, Arrived quantity, Order price, Price each, Discount and Amount (price each multiplied by quantity) are loaded from the invoice/purchase order. All you have to do is to check that it corresponds with the invoice and, if so, authorize. You authorize by double-clicking in the Authorize field or by pressing the plus key (+). If the invoice is in foreign currency, then the Order price, Price each and Amount are all shown and entered in foreign currency. The current exchange rate is then displayed in the yellow field.
If you want to modify the coding or the price (if the purchase order shows one price and the invoice another price), you click in the field and enter the correct account number, amount, etc. Any adjustments of the price, coding, etc. will be saved to the final coding of the invoice.
When you open the Info menu by right-clicking, you can choose Purchase order to directly go to the Register Purchase Order procedure for the current purchase order on the coding row. You can also choose Update prices to update the standard prices etc. for the current part on the coding row.
You can also add rows (for example a freight cost that has been added to the purchase order). Such added coding rows will be saved as row type 2 during the final coding. However, you cannot delete coding rows that include purchase orders.
![]() The part number is displayed in red if the part is to be receiving inspected.
The part number is displayed in red if the part is to be receiving inspected.
Different alternatives of how to save the invoice
Besides approving the invoice by clicking on Save, there are also other alternatives. These alternatives can be accessed via File in the window menu.
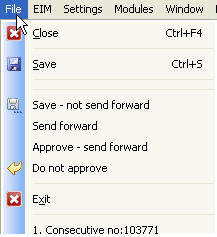
The File menu when the EIM is in use.
Some of the functions above can also be accessed via the buttons under the Window functions:
![]() Save is used to authorize/approve the invoice. The invoice will then be sent to the next signer or to the final coding. Next invoice is automatically displayed.
Save is used to authorize/approve the invoice. The invoice will then be sent to the next signer or to the final coding. Next invoice is automatically displayed.
![]() Save – not send forward is used if you have processed the invoice in any way, for example added a note or made a coding, but you want it to remain in your inbasket.
Save – not send forward is used if you have processed the invoice in any way, for example added a note or made a coding, but you want it to remain in your inbasket.
![]() Send forward is used in case the invoice has been sent to you by mistake. You can then forward it to another signer. You will then see a list with users/signers to whom you can send the invoice.
Send forward is used in case the invoice has been sent to you by mistake. You can then forward it to another signer. You will then see a list with users/signers to whom you can send the invoice.
![]() Approve – send forward is used if the invoice should be approved by you but you also want to forward it to another signer for further approval. You will then see a list with users/signers to whom you can send the invoice.
Approve – send forward is used if the invoice should be approved by you but you also want to forward it to another signer for further approval. You will then see a list with users/signers to whom you can send the invoice.
![]() Do not approve is used if you do not want to approve or authorize an invoice. It is good if you first add an annotation on the invoice with the cause of this. The invoice will then automatically be sent to the final coding where a message will be displayed saying that the invoice has not been approved.
Do not approve is used if you do not want to approve or authorize an invoice. It is good if you first add an annotation on the invoice with the cause of this. The invoice will then automatically be sent to the final coding where a message will be displayed saying that the invoice has not been approved.
When there are no more invoices to final code
When you have completed all invoices, you will receive the following message: When you click OK, the procedure will close.
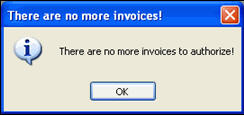
Message saying that there are no more invoices to final code.
Steps