In this section, you will find settings that apply to the recording terminal.
Only recording with card code?
If you configure this setting, you can only clock-in to the Recording Terminal by using a card. A card code must then be registered in the Update Employee procedure. This option will not allow clock-in by just entering the employee number.
This limitation is useful from a policy/security point of view, since it will not allow the employees to clock-in using someone else's number, and thereby for example be able to clock-in/clock-out and start jobs for other employees, or see other employees' personal data.
Special function for Touch Screen?
If you configure this setting, a numerical keyboard will open on the screen when you click the employee number field in the Recording Terminal. This setting will also activate a graphic aid or help function in the recording terminal that is used when you start and finish operations. This aid is primarily intended to be used to facilitate the use of a touch screen.
Seconds before Recording Terminal is automatically purged
This setting determines how long the recording terminal can be left unused, after an employee has entered his/her employee number, before the terminal automatically returns to its starting (initial) position. Ten seconds before this purge takes place, a message will appear warning of the imminent purge.
Maximize time clock after automatic purge?
This setting creates a "screen saver" in the form of a large clock which is displayed in the recording terminal after it has been left unused for at least the number of seconds that you entered in the above setting.
Interval for synchronizing the recording clock (in minutes)
This setting is used to determine how often the recording terminal should update the clock with regard to the clock on the server and update new General message, if necessary.
Allow attendance recording adjustments in the Recording Terminal?
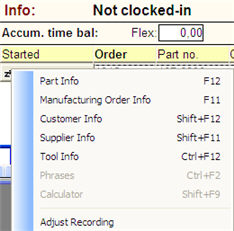
If this setting is activated, you can use the Info menu (access it by right-clicking) in the Recording Terminal to go to the Info portion in the In/Work/Out modes and open the procedure called Adjust Recording, and make adjustments in the attendance recording for the current day. You can adjust schedule numbers, overtime codes and absence codes.
Image of the right info menu in the Recording Terminal.
Allow work recording adjustments in the Recording Terminal?
If this setting is activated, you can use the Info menu (access it by right-clicking) in the Recording Terminal to go to the Info portion in the In/Work/Out modes and open the procedure called Adjust Recording, and make adjustments in the work recording for the current day.
Number of days back in time that can be adjusted
Here you can choose to allow adjustments to be made of recordings for the number of days back in time that you enter here (see the previous settings). You can adjust both attendance recording and work recording here. However, you can only adjust overtime types and absence codes for attendance recording.
Plan absence via Recording Terminal?
With this setting you can select whether or not the employees should be able to enter their own planned absence in the Recording terminal.