Document Viewer
The Document Viewer  button is shown to the right of the buttons for comment, instruction or additional text in different procedures, if you use the supplement Document Viewing. By using this button you can, in the Document Viewer window, link external documents (such as drawing files, instructions or image files) to the loaded record in the current procedure.
You can use the same button to view already linked documents. The button's appearance is then changed  . The linked document will be shown in the same window.
This is a split window, where the file names of documents linked to the record in question are shown in the left part. In the right part of the window you will see the marked document. In the lower part of the window, there are buttons which allow you to link additional documents or remove existing document links.
 The Document viewer window can be maximized and reset to normal size by double-clicking on the title bar of the window.
Link Documents in the Document Viewer Window
When you click on the Document Viewer button the Document viewer window appears.
Click on the Link file... button in order to link a new document to the current record. The Link file window is also a split window, in which the registered document file paths are shown as directories in the left portion, and the documents of the marked folder are displayed in the right portion. You can select the document you want to link from any one of the registered document file paths.
If a document is linked to an operation, order, inquiry or quote you can also select if an of the linked document should be made.
When linking documents, the system will remember the latest folder you used and this folder will then be suggested the next time you link a document.
In order to link documents in the Document Viewer window, you must have registered document file paths in the Update Document Path procedure in the Global Settings module.
Link Document via the Info Menu
You can also link documents by right-clicking on the button Document Viewer to open the Info menu and there select Link document. Then a file dialog box opens where you can select documents from a folder in the file system.
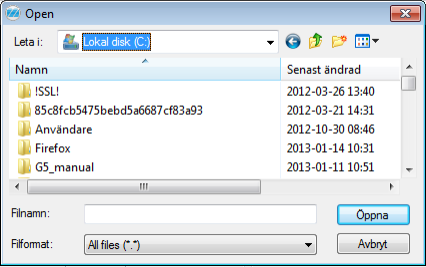
The file dialog box.
If the folder from which the document is selected does not exist in a registered document path, the following warning window appears containing three alternatives.
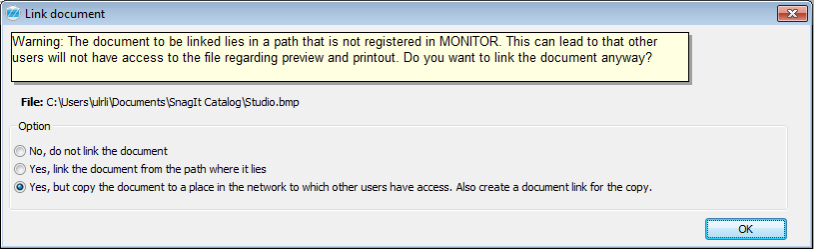
The warning that appears when a document path is not registered.
Meaning of the different options:
- No, do not link the document - select this option if you do not want to link the document.
- Yes, link the document from the path where it lies - select this alternative if you want to create a new document path to the location of the document. We recommend that this location is a folder on a file server or the database server to which all users have access. The person linking the document must also have full access to the Update Document Path procedure.
- Yes, but copy the document to a place on the network to which other users have access. Also create a document link for the copy. - if you select thip option the document will become linked to the folder structure \<ftg_nr>\YYYY-MM\ in the path selected by the setting called Path to location on the network for external files, under Document Viewing under the System tab in the Settings procedure. You must have write permission on the location in the network which the path is pointing to, otherwise it is not possible to link the document. When choosing this option, a new document path pointing to the folder \<ftg_nr>\ will be created, unless it already exists. You must in this case also have write permission in the Update Document Path procedure (<ftg_nr> is a folder created from the company number used, for example 001).
When you use the bottom alternative a situation might occur where a linked existing document in the folder has the same file name as a new document being linked with this option. If so, the window below appears allowing you to select if the old document shall be replaced (overwritten) or if the new document shall be saved using another file name.
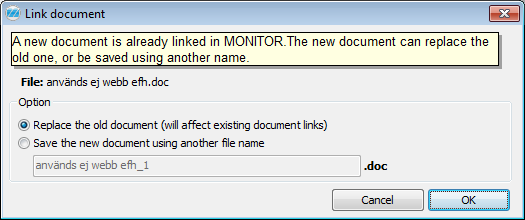
Question that appears if a linked document has the same file name as an existing document.
Meaning of the different options:
- Replace the old document (will affect existing document links) - if you select this alternative, the old document will be replaced (overwritten). In this case, remember that existing document links will show the new document.
- Save the new document using another file name - if you select this alternative, you can enter a new file name for the new document.
With the setting called Default alternative when linking a document with the same name as the existing you can select which of the two options above that should be default. You find this setting under the Document Viewing heading under the System tab in the Settings procedure.
Finally when linking documents, the dialog box below appears allowing you to select AutoPrint of the document. If you activate this option, you can also choose printer and orientation for the printout.
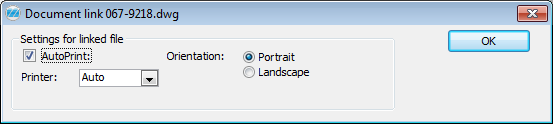
Printout settings for linked documents.
Link Document Using the Drag and Drop Function
You can also link documents using the drag and drop function from for example the Windows Explorer or an e-mail program. When you drop the document on the Document viewer button, an automatic link is created.
If the folder, from which the document was dragged, does not exist in a registered document path, a warning window appears containing the three alternatives above.
In cases where additional settings are available, for example if you want an automatic printout (see above), another window appears allowing you to configure these settings prior to the linking being completed.
If multiple documents are being dragged in at the same time you will find an additional alternative called Settings apply to all files on linking occasion which makes the printer settings apply to all documents that you linked at the same time.
Unlink Documents in the Document Viewer Window
You also unlink documents in the Document viewer window. Click on the button Unlink file... in order to delete the link to the document selected in the left portion of the window.