The Recording Terminal will have different appearances in the same window depending on the attendance status of the person using it, and what it is being used for at the time. Furthermore, the employee's settings will also determine the layout of the window. Below is a description of the different modes of the Recording Terminal and how they are used during recording.
The Basic Mode
The first mode - the Basic mode - appears when no one is using the terminal. It only shows the heading row and a general message. In this mode, the Recording Terminal works as a bulletin board, where you can show general information that all employees will see before they start recording. The terminal will automatically return to the Basic mode after recording has been performed, and a yellow information field will show what type of recording just took place.
If the setting Use start page in Recording Terminal has been activated under the Miscellaneous heading under the System tab in the Settings procedure, then you can select to use the Start Page in the Recording Terminal in the basic mode.
In - Work/Out - Work/Stop
In the modes In, Work/Out and Work/Stop, the employee can clock-in and clock-out as well as choose what kind of work recording to perform. The employee normally records using his/hers employee number, but you can configure a setting in order to only allow recording using a card code for greater security.
In these modes the employee can access additional personal information. If the employee is only going to load such information and not record, you can use ESC (press 2 times) or the button ![]() to return to the Basic mode. If this is not done, there is also a function that automatically purges the terminal after it has not been used for a certain number of minutes.
to return to the Basic mode. If this is not done, there is also a function that automatically purges the terminal after it has not been used for a certain number of minutes.
Start Direct Work
The Start work mode appears when an employee has chosen to Start direct work or Change direct work in the Work/out mode. Here the operator selects which work will be started.
Finish Work / Partial Report Work
When work is being finished or partial reported, the Finish work/Partial report work mode is used. Here the operator can enter the approved and rejected quantity, rejection code, interruption code, goods location or stock location for the operation that is being finished. A work or job can be put on standby instead of finishing it, if the operator needs to take a break or pause the operation.
The image below shows the work flow during attendance and work recording. Every moment or step that represents recording of some kind, is symbolized by a square with rounded corners. The work flow for these are described in detail in the chapters for each respective mode.
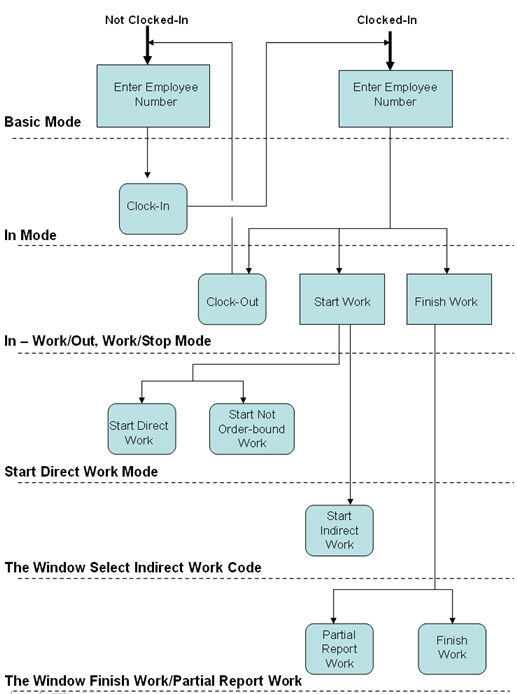
Flow chart of the Recording Terminal.
All the buttons in the Recording Terminal that lead directly to recording, are marked with the symbol ![]() that represents a time clock. The actual recording is then confirmed with a large yellow information field, that indicates what kind of recording was performed and then the Recording Terminal will return to the Basic mode.
that represents a time clock. The actual recording is then confirmed with a large yellow information field, that indicates what kind of recording was performed and then the Recording Terminal will return to the Basic mode.

Example of the information field during recording.
If an employee makes an incorrect recording or if he/she does not have access to record at a certain terminal, an error message appears.