Here you can read about the main types of lists that can be displayed in this procedure, and how to use them. You can also read about how to manage the range of orders in the different list types.
![]() Range of Orders - Clearance List
Range of Orders - Clearance List
If you check the Clearance list option, the range of orders is used as a basis to check which orders or order rows that can actually be delivered of those that were selected in the Create tab.
In the range of orders, the system suggests which entire orders can be delivered by highlighting that order in green and checking the Clear order? box. When you save, the reserved quantity of the parts on the order will be cleared. The parts are also deducted from the available balance in stock for those parts.
If the entire order cannot be delivered (only certain order rows could be delivered) the system will instead suggest that you clear order rows by checking the Clear rows? box. The order will no longer be highlighted in green. By clicking on the Clear rows button (right arrows) under Window functions, the clearance list opens and if you there click on the Save button, the reserved part quantity will be cleared for those parts located on the order rows that were selected for clearance.
You can check/uncheck these options in the Clear order? and Clear rows? columns, and that way you can determine which orders or order rows that should be cleared. For example, you can uncheck an entire order if you would prefer to clear more rows on another order instead.
At the far right, there is a column that displays which orders will be included in the pick list after clearance, this can be printed directly from the list. These orders are marked with a P. If you select the orders in the Create tab with the Already cleared orders option checked under Show... the "P" will not appear for these orders, if the pick list has already been printed.
In this example, two entire orders have been fully cleared (highlighted in green) and one order has order rows that can be cleared. To clear order rows, read more under the printout sample for Clearance list.

Sample of a range of orders with the Clearance list option.
If you check the Pick list option, the range of orders will only be used to see for which orders you can print pick lists. You can also make manual changes in the range of orders to determine which orders or order rows you want to clear.
The range of orders shows the orders that were selected in the Create tab for printing a pick list. The pick list can be printed by using Display List and then Print. For those who do not need to clear parts before withdrawal and delivery (for example, if this is handled by only one person in your system), it is easier to use the Pick list alternative. In the range of orders, all the selected orders are suggested to be included in the pick list. If you use this option, the system will not check whether the available balance covers the reserved quantity on the different orders, which is done if you use the Clearance list option instead.
You can deselect/uncheck orders under Print pick list? (Print PL?) that you do not want to include in the pick list.

Sample of a range of orders with the Pick list option.
The Clearance list displays which order rows that can be cleared. This list shows for each part, all the necessary information for clearance. Under Ordered you can see if there are any orders (manufacturing or purchase orders) made for this part. Under Balance you can see the current stock balance. Under Cleared earlier you can see the previously cleared quantities of the part. Under Quantity you can see the reserved quantity for this order row. Under Avail. balance you can see the available balance after clearing this order row. Under Booked the order row that should be cleared is selected. Under Period you can see the delivery period and under Order no. you can see to which order number the order row belongs.
Order rows that are to be cleared are saved by using Save. You can then see the clearances under the C column under the Order Window tab in Part Info. There you can also see additional information for the order rows, such as reservations from other orders.
In the sample below, the first two rows consist of two different orders that were cleared from the range of orders. For already cleared order rows, the Quantity appears in grey font and the Available balance in bold italic font. The third order row with the delivery period week 98141 has been selected to be cleared. The ordered quantity 30 pcs is deducted from the current available balance of 38 pcs. This means that the available balance after the clearance is saved, will be 8 pcs.
If you clear further order rows, the available balance will become negative. If the available balance is negative, it appears in red in the list.

Sample of a Clearance list.
Once the orders or order rows that can be delivered have been selected for clearance under Booked and then saved, you can print a pick list using Display List and then Print. Only the cleared rows will then be included in the pick list.
A pick list can always be printed without prior clearance by selecting the list type Pick list in the Create tab. But in that case, all the orders will be included by default from the range of orders you have selected in the Create tab (i.e. even the orders that cannot be delivered because the available balance for these parts is not sufficient to cover the orders). However, in the range of orders you can select the orders that you want to include in the pick list.
If any clearance should need to be removed once it has be saved, you can cancel it at order row level in the clearance list. By deselecting the order rows that you want to remove clearance for under Booked and then clicking Save, you will cancel those clearances. Then you can also make sure in the planning tab Part Info, that the symbol ">>" has been removed from the order/orders under the C column.
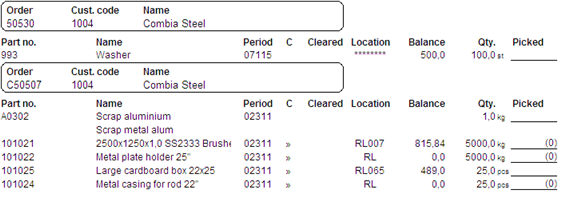
The Pick list displays information per order, including Part number, Name, Delivery period, Cleared and the cleared Quantity, Location for stock withdrawal, location Balance, and the Quantity to withdraw. At the far right there is also a space where you can enter the Picked quantity and the initials or signature of the picker.
If the quantity to be withdrawn is larger than the available balance on that location, the quantity to be withdrawn appears in red italic font in the list. To the far right you will then also see the symbol (0) which lets you know that you can pick the part from the location, but not the entire quantity (quantity > available balance).
If there are additional text rows (row type 4) on the order, these will not be printed on the pick list when sorting by Location.

Sample of a Pick list.
The lists Pick list EDI / packaging, Pick list EDI / pack. 2 rows and Pick list EDI / total are all adapted for EDI and can be used for customers who receive EDI messages such as delivery note bases (Aviexp) and invoices (Invoic).
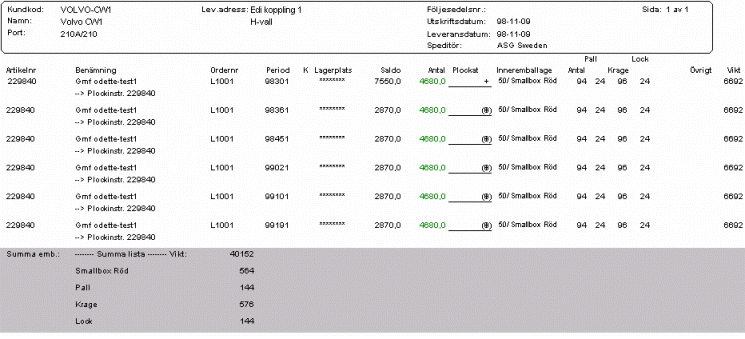
Under the header, the pick lists displays information about each order and the delivery period on a separate row. First you can see the Part number and Name. (If there is no price on an order row, you will see a red asterisk * after the part number.)
Then you can see the Delivery period, whether the order row has been Cleared, from which Location the picking will be done (also see multiple stock locations below), available Balance on the location, Quantity to be picked and a column where you can manually enter the Picked quantity.
The Quantity column can be edited. For example, if an order row cannot be delivered on time, you can postpone the delivery of that row until the next delivery occasion, by enter 0 (zero) on that row. That order row will then be canceled for this printout, but still remains in the customer order and can be printed on a new pick list. If you change the quantity on the pick list, the information in the packaging structure will automatically be adjusted accordingly.
If a customer has a pick instruction, it will be shown on the pick list and it will be placed after the order information but before the order rows. If a customer specific pick instruction exists for a part it will override the general pick instruction for the part. These part instructions are displayed last, before the next part row.
In the right corner of the Picked column you can sometimes see different symbols that have a special meaning:
 - A zero and a plus sign within parenthesis means a combination of the above mentioned alternatives.
To the right of the Picked column you can see information about the packaging structure for each order row.
At the bottom of the list, in the grey area, you can see packaging structure totals for the entire pick list. Here you will see the loading meters, if it has been entered for the part in the Update Part procedure.
The pick list also has certain functions that can be accessed via the Info menu if you right-click in the list, such as Edit package. Read more about these functions under Info menu and under Edit package.
Please read more about EDI and Packaging in the Using MONITOR Procedures guide.

Sample of a Pick list EDI / packaging list.
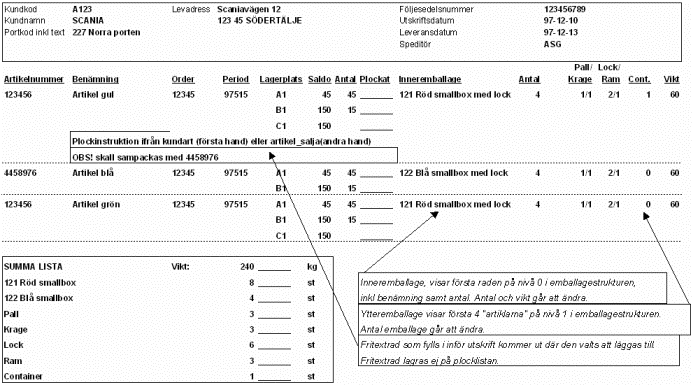
Below you can see another example of the pick list with explanations of the packaging structure in the list.

An explanation of the pick list.