Why Use This Procedure?
In the Comprehensive Reporting procedure, you can perform all kinds of reporting of your own operations and material, and of subcontracts for a manufacturing order that has either been registered or started. You can then monitor your reporting in the Order List – Manufacturing procedure, and view them in the Post-Calculation procedure.
You perform reporting based on an order number and the incorporated parts in that order. You can perform partial reporting for a smaller quantity of the planned parts in an order. In this case, the incorporated operations can be reported with the suggested planned values, using so-called quick reporting and rest reporting. You can also report consumed material. When reporting a number of parts, you can indicate that the material should follow the operation, in which case the planned material quantity is automatically suggested. However, you can always change this value, in case the actual consumption differed from the planned consumption.
If you perform partial reporting, each report is totaled with regard to both quantity, time and material.
What Information Does This Procedure Provide?
When you load an order number in the Search Form, you can see different planning information for the part in question. The information concerns incorporated operations and material for this part. This is shown in two tables in the window containing operation rows and material rows.
The left portion of the window shows a structure map containing all incorporated parts in the order. If you select a part record here, the system will load the order information, operation and material rows for the part and view them in the tables. In the tables you then enter reporting values.
What Kind of Reporting Can Be Performed Here?
In the Comprehensive Reporting procedure you can report operations, material and subcontracts for each part. You can perform partial reporting or quick / rest reporting. The procedure is a combination of the other reporting procedures Operation Reporting, Material Reporting and Quick / Rest Reporting. You will therefore find different reporting alternatives under the heading Report what:
Reasonability Check
There are reasonability checks that are activated under the Orders heading under the Manufacturing tab in the Settings procedure. By using these you can get a warning if the reported quantity exceeds the previous operation's reported quantity. You can get a warning or block for reporting in case a material has rest quantity > 0 when the reporting takes place for the last operation on the highest level, that is when the order will become a status 4 order (Finished).
By using the setting Reasonability check when deleting rest?, under Finish work under the Workshop Info tab in the Settings procedure, you can get a warning if there during a deletion of rest on an operation still remains a rest on previous operation.
The setting Check if balance is negative during reporting determines if you shall be able to make reportings with negative balance. This setting is configured under the Orders heading under the Manufacturing tab in the Settings procedure.
Nonconformity Management for Own Operations
The nonconformity management can be simplified when reporting own operations. The setting Register nonconformity via Operation Reporting/Comprehensive Reporting must then be activated under Orders under the Manufacturing tab in the Settings procedure. When you save a reporting of an operation (which contains a reject quantity), the Register Nonconformity procedure will open automatically and a new nonconformity is created containing all information from the reporting.
Subcontract
If there are subcontracts, the subcontracting cost is reported in the field Reported time. Planned costs are loaded from the operations rows in the preparation if you have activated the setting Suggest rest on operation. The unit is the currency that is registered for the operation.
During subcontract reporting, you can create a supplier invoice basis. This is determined by the setting Create supplier invoice basis during subcontract reporting?, under the Accounts Payable heading under the Purchase tab in the Settings procedure. In this case the field Reported time will show zero and is greyed out and no subcontracting cost is entered in this procedure, but the subcontracting cost is reported to the invoice basis and is shown when the invoice is registered in the Register Supplier Invoice procedure. We suggest that the supplier invoice basis is coded according to the settings on the product group / purchase account. Before you can create a supplier invoice basis, the purchase order number must exist in the system. It is created when you print the subcontract documents. It this has not been done, you will see a warning that tells you that the purchase order number is missing.
![]() It is possible to Exclude from creation of subc. invoice basis per work center in the Update Work Center procedure.
It is possible to Exclude from creation of subc. invoice basis per work center in the Update Work Center procedure.
When reporting subcontracts, the message below appears allowing you to link to the Arrival Reporting - Subcontract procedure and make the reporting there instead.
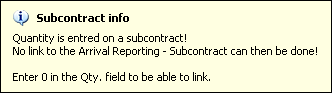
Message when reporting subcontracts.
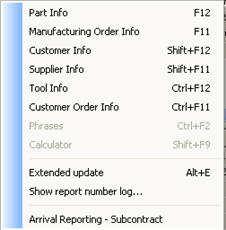
The Info menu with the alternative to link to the Arrival Reporting - Subcontract.
Multiple Stock Locations
A part can have several stock locations. If you use multiple locations, you can open a separate window in the Finished field to report an arrival for the last operation and Consumed for a material withdrawal, if the operation is for a part with multiple stock locations If so, you can perform reporting per stock location.
If you have previously used multiple locations and then deactivated this setting in the Settings procedure, this window will still appear when reporting parts that still have multiple locations.
When reporting the last operation, you can also add or change the stock location names in that window. You can not do this when reporting consumed material, though.
If you select Suggest rest on operation a control takes place according to the below:
If you select Suggest rest on material a control takes place according to the below:
You can also use the function that will always create new locations during reporting of finished parts. The locations will then be named using the *1001, *1002* format. Each reporting will then create a batch of parts with their own location. This is used when, for example, you need to separate all the arrived parts using different arrival dates.
Read more about how to use multiple stock locations in the Location section in the documentation of the Settings procedure.
Extended Update
You can select to perform a more detailed update on operation and material rows by selecting the Extended update feature, which can be found in the Info menu using the right mouse button. If you use this option, you can also report rest quantity and rejected quantity for operations. You can enter employee numbers and other work centers. For material, you can report the rest quantity and reported price, as well as enter the batch number and its quantity.
If the supplement Tool Management has been installed, you can also choose to update a tool list linked to an operation, and select an individual tool entity if needed. Read more under Tool Management in Comprehensive Reporting.
Print Transport Labels
There is a setting Open print transport labels after operation reporting (to stock), under the Manufacturing tab in the Settings, that enables transport labels to be printed when reporting the last operation which creates transfer to stock. The Print Transport Labels procedure is then automatically opened and all necessary information from the reporting is already entered, after executing the reporting by using Save
Adjusting the Layout
The proportions between the window sections can be changed and this change can be saved per user.
Window Functions
Read more about the Window functions under Window Functions in the MONITOR Basics guide.