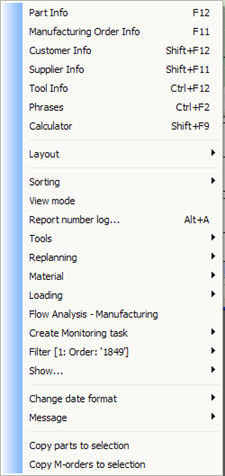
The available functions for the priority plan when using the Info menu are described below.
The Info menu in the Priority Planning.
Layout
Here you can select to reset the standard layout or save your own layout of the table. This function is useful if you have moved the columns according to your needs. Read more about this function in the Columns in Lists and Tables in the chapter MONITOR General Information in the MONITOR Basics.
Sorting
The following alternatives are available:
View Mode
This changes the layout or appearance of the priority plan from the Priority mode, so that it shows the operations day by day, starting from today's date, which is called the View mode. It adds two new columns: Capacity that shows available capacity in hours for each day, and Priority row, that shows the internal priority between the rows with the same value for Priority operation. Now you can see what was used as a basis for the calculation of the New finish date. Select the View mode again to return to the Priority mode.
Report Number Log
Shows a table over everything that has previously been done with this operation, please see Order Info in the Manufacturing module.
Tools - Filter on Incorporated Tools
Here you can create a filter to show all operations in the priority plan with the same incorporated tool, or tool within a certain interval of tool numbers or names. This feature is used to find operations that can be run simultaneously, for example to show all operations with the same tool requirements. You can enter the tool with individual tool numbers/names or with an interval of From - To. You can also use so-called wildcards to simplify the search.
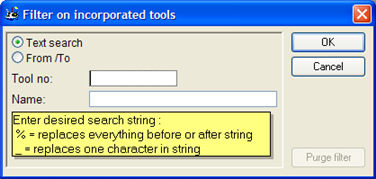
The Filter on Incorporated Tool window.
Replanning - Change Capacity...
This function allows you to change the capacity for the work center for specific days.
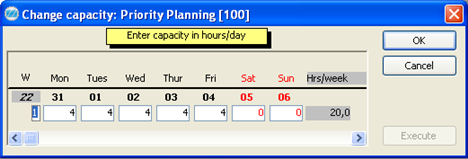
The Change Capacity window. In the Week field you enter the number of shifts, and in the fields for each respective day you enter the number of hours per day.
This feature is linked to the production calendar, and any changes made here are automatically applied to the production calendar as well. In this window, you can change the capacity both for the number of hours per day, as well as for the number of shifts per week.
Replanning - Replan by New Finish...
This feature is used to replan the entire manufacturing order according to the column New finish for one of the incorporated operations, in other words one of the work centers is counted as the determining factor, and the priority plan in that WC is superior to the other ones.
First select the order that should be replanned by clicking on the rows in the Order column (see below). (Use Ctrl or Shift + clicking to select several orders).
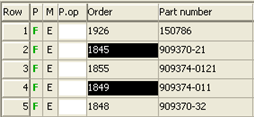
Selected orders in the priority plan.
This will open a window where you can choose to replan directly or via the Loading Selection procedure in the Manufacturing module. See the image below. The replanning is done so that the operations in the selected priority plan are moved so that the planned finish date coincides with the New finish column. All the other operations in the selected manufacturing order are also moved.
The Loading Selection procedure shows how the incorporated operations in the selected order will be moved, and the replanning can also be adjusted before it is executed.
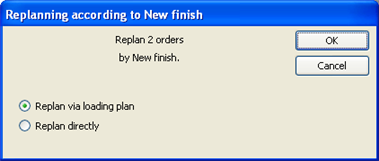
The Replan by New Finish window.
Replanning - Replan Work Center...
This function is used to replan selected operations to another work center (several operations are selected by Ctrl or Shift + clicking in the Order no. column). This opens another window used to select a new work center.
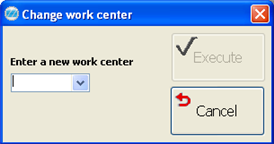
The window used to select a new work center.
After you select a new work center, you will receive a control question.
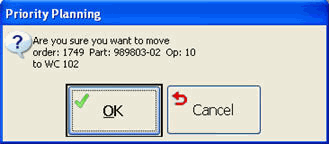
The control question when selecting a new work center.
Replanning this way means that the operations are given another planned work center, and that the cost factors and settings for work recording, for example, are loaded from there instead. Please note that this replanning is not the same thing as using the Operation Reporting procedure and selecting Other work center, which means that you get calculation differences between pre-calculations and post-calculations.
Even the operation name will be changed to the new work center's name, unless it has been changed in either the Preparation or Adding / Replanning procedures after the order was registered. In that case, the name will not be changed.
You can perform the equivalent replanning in the Recording Terminal procedure.
Replanning - Register Manufacturing Order
Here you can link from the order number field to the Register Manufacturing Order procedure. The purpose is to be able to replan the order or to modify the order additional text.
You can also link from the P.op. field, but this can only be made for the selected operation/order.
Replanning - Prioritize the Entire Operation List
Here you can prioritize all operations on an order by having them inherit the same priority number as the one on the operation you just changed. You can change many operations at the same time as long as you have saved the priority for the priority plan that you want to use as the master plan. The operations for which you do not want to change the priority can be deselected.
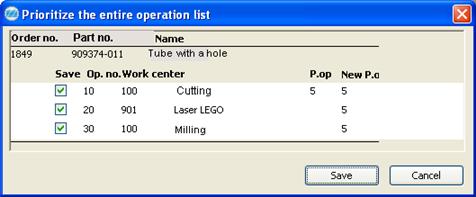
Sample of the selection Prioritize the entire operation list.
Material - Filter on Incorporated Material...
Here you can create a filter to show all the operations in the priority plan with the same incorporated material, or material within a certain interval of part numbers or part names. This feature is used to find operations that can be run simultaneously, for example to show all operations with the same incorporated raw materials. You can enter the material with individual part numbers/names or with an interval of From - To. You can also use the wildcards percent (%) and underline (_) to simplify the search.

The Filter on Incorporated Material window.
Material - Purge filter
This alternative purges the filter that has been selected for the incorporated material.
Material - Material Clearance...
Material Clearance can be used with two purposes in mind: on one hand to check if there is sufficient material for an operation, and on the other hand to set aside or "reserve" that material to insure that it will be available when the operation is started.
Before selecting this option, one or more operations must be selected in the Order number column in the priority plan. For additional help on how to use the Material Clearance procedure, please see Material Clearance in the Manufacturing module.
The Material Clearance will do the following:
Material - Requirement Calculation...
This feature is used to run a requirement calculation for one or more operations in a priority plan, where the operations have one or more incorporated materials.
First select the order/orders that you want to calculate the material requirement for by clicking in the Order number column (use Ctrl or Shift + clicking to select several orders, see image below).
Selected orders in the priority plan.
This will open the procedure called Requirement Calculation in the Inventory module for the selected operations.
Loading - Loading Plan...
This will show the loading plan of the work center. Please see more under the Loading / Work Center procedure in the Manufacturing module.
Loading - Lead Time Chart...
This is the same procedure as the Orders / Work Center in the Manufacturing module, with one addition: the New finish is shown so that you can compare the Master plan with the priority plan.
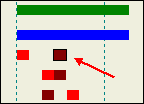
Image from the lead time chart. The New finish date is shown in brown.
Flow Analysis - Manufacturing
By using this alternative you can load the order to the Flow Analysis - Manufacturing procedure in order to make a flow analysis of the entire order.
Adding / Replanning
You can link to this procedure from the P.op field. The purpose is to be able to replace one material with another, if the material failed to be fully cleared.
Operation Reporting
You can link to this procedure from the P.op field. The purpose is to be able to change the rest quantity of the operation.
Print Order Documents
You can use this function to print the manufacturing order documents for the selected orders in the priority plan. First select the order/orders that you want to print by clicking in the Order number column (use Ctrl or Shift + clicking to select several orders, see image below).
Selected Orders in the Priority Plan
If you select the option Print order documents the window Print order documents will open and allow you to print the documents in question. The default shop packet will be the one entered in the Update Work Center procedure, but it can be changed here if needed.
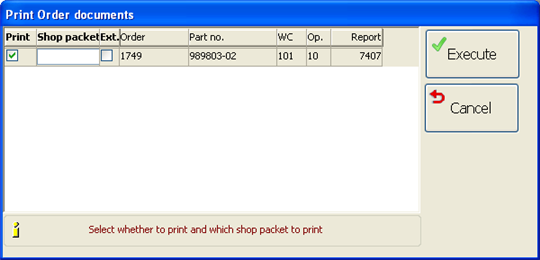
The Print Order Documents window.
Create Monitoring Task
If you have installed the supplement MONITOR Agent you can choose to create three monitoring tasks for a operation. The monitoring tasks will be registered in the Monitoring Tasks procedure in the Global Settings module. The tasks that can be created here are:
Filter
By selecting this alternative you can perform quick filtering on an optional column value. There are several different filtering alternatives. Right-click over the column value that shall be filtered and select "> Greater than" in order to sort out all operations with a greater value than the column value. Read more about this filtering in the Filtering Lists via the Info Menu in the chapter MONITOR General Information in the MONITOR Basics.
Filter - Purge Filter
Use Purge filter to go back to the basic mode.
Show - New Finish
This option determines if the New finish column should be shown in the priority plan. If you choose to remove this column, then that option is saved for the user.
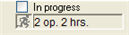
Show - New Finish and Accumulated Time with in Progress
This option will include the hours for work in progress in the calculation of the values for the New finish column. The field for incorporated hours "In Progress" which appears in the Heading row opens up and the user can adjust the hours in progress. This adjustment also affects the values in the Accumulated time column.
Incorporated hours.
This way you can obtain a better value for the New finish date, since the work that has already been started will take up additional hours of the day's capacity, before the first operation in the priority plan can be started.
You might also need to manually adjust the hours, if a few hours of the day have already passed when you calculate this. By increasing the number of hours in progress, the next date for the New finish is pushed ahead in time, which will also happen in real life.
Show - Rest Time with E-factor
This option will make all the values in the Rest time column be divided by the value of the work center's Efficiency factor.
Show Nonconformities
If the order is an adjustment order of a nonconformity, you can see information about the nonconformity.
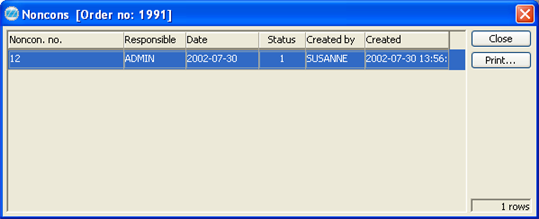
The Nonconformities window.
Change Date Format
This option affects how the period is shown in the priority plan, the options being:
The default format is the period format that was configured in the Period Formats under the System tab in the Settings procedure.
Message - Add Message
This option will open the Messages tab for the operation that is selected in the upper portion of the window. You can then write a message under this tab, which is then linked to the operation. If a message exists for the operation, an X is shown in the column after the Operation name
This message can then be read by all the operators who start this operation in the Recording Terminal.
Message - Delete Message
Use this alternative to delete a message for the operation. The Messages tab will then be inactivated and the X will disappear from the column.
Copy Parts to Selection
By using this alternative you can copy all parts in all orders in the priority plan to the Selection window. This is useful if the part selection shall be analyzed in another procedure or list. Read more about the List Selections in the MONITOR General Information chapter in the MONITOR Basics.
Copy M-orders to Selection
By using this alternative you can copy manufacturing orders to the Selection window. This is useful if the manufacturing order selection shall be analyzed in another procedure or list.