What Does This Procedure Do?
This procedure is used to register incoming orders received from customers. When a customer order has been registered and sent, you can monitor the order and the delivery, as well as update statistics. Deliveries are made in the Delivery Reporting procedure. A customer order will also affect the planning as a reservation in stock for the current delivery period. You can print a list over the current order backlog using the Order List - Sales procedure.
Registering a New Order
The registration window is divided into a heading row and two tabs called Main and Rows. In the heading row you select a customer when you register a new order. When registering a new order, you can enter an optional order number. The order number can consist of both digits and letters (alphanumerical), and can contain up to 10 characters.
It is also possible to use the automatic numbering system but then the order number will consists only of digits. You enter a Start code for the current number series in the Number Series procedure in the Global Settings module.
By using the setting Enter order number during save in Register Customer Order, under Orders / Quotes under the Sales tab in the Settings procedure, a window is displayed during save in which you can enter an optional order number.
The first tab Main, contains general information about the order, such as the customer name, terms of payment etc. Most of this information is taken from the customer register, but can be modified for an individual order.
Under the second tab, Rows, you register what the customer has ordered. This is where you register different row types, such as part rows, service rows, additional order rows, etc. You can also enter a price each and the correct coding account for each order row.
A tab called Invoicing plan is available when using invoicing plans. This tab will be shown if you have selected an invoicing plan in the order header. If you want to use invoicing plans you must configure the setting Manage Invoicing Plans on Quotes/Customer Orders under Invoicing plans under the Sales tab in the Settings procedure.
By using the button Calc. total price you can calculate a total price for the order. This is activated by the setting Show only total price on quote/customer order/invoice, under Orders / Quotes under the Sales tab in the Settings procedure.
Under the Order confirmation and Delivery note tabs you can preview the respective forms before printout. These tabs are activated the first time the order is saved.
Under the Activities tab you can register activities and log e-mail conversations regarding the order.
You can check the lead time to customer if you have activated the setting Check against Part Lead Time and Balance During Order Registration?.
Register New Order from XML File
In those cases when both the customer and supplier use MONITOR, the customer can send a purchase order to the supplier as an XML file in an e-mail message. The supplier can then import the XML file by using "drag and drop" from the e-mail message to this procedure. This way a new customer order will be created. Read more about this in the chapter New Order from XML File. To register new customer orders from an XML file in an e-mail message is a function included in the MONITOR-to-MONITOR feature.
Configuration on Order Row
If you have installed the supplement Product Configurator and you load a configurable part (part linked to a configuration group) to an order row, the configuration window opens automatically. You can then use this window to configure the product on the order row. Please read more about the configuration window under the chapter Product Configurator in the Using MONITOR Procedures guide.
You can also load the configuration window manually on an order row by using the button ![]() under the Conf. column.
under the Conf. column.
In the Product Configurator you can see what is wrong when you open an existing configuration that no longer is valid due to changes made in the configuration group's basic data. Why the configuration no longer is valid can for example be that a selection has been deleted in the basic data. Another case can be that a new selection group with mandatory selections is added to the basic data.
In a window you will see a list of the information that does not coincide with the basic data in the existing configuration. You will find two alternatives: adjust the configuration so that it will coincide with the basic data or keep the existing. If you choose to adjust the configuration you can make changes later on but if you choose to keep the invalid configuration you cannot make any changes.
![]() You must
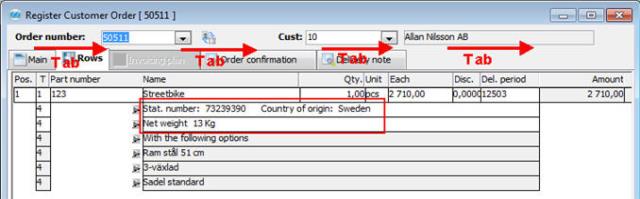
You must ![]() change row (row type 1) in order to show Statistical number, Country of origin and Weight on the delivery note, order or invoice for a configured part. Use the Tab key to change row.
change row (row type 1) in order to show Statistical number, Country of origin and Weight on the delivery note, order or invoice for a configured part. Use the Tab key to change row.
Update/Modify Existing Orders
This procedure also allows you to open an existing order and modify previously entered information, or add/delete order rows. The heading row is where you select an order number when loading an existing order. Please note, however, that you cannot change the customer code on an existing order if the Order status > 1. The Changed order confirmation tab is activated if the quantity or delivery period has been changed on an already printed customer order (status 2). You can print a new order confirmation including the modifications as well as the old information.
![]() If you update the quantity on an order row that contains a part with an alloy cost, the quantity on the service row will not be updated. You must change the entire order row for the alloy cost to be updated.
If you update the quantity on an order row that contains a part with an alloy cost, the quantity on the service row will not be updated. You must change the entire order row for the alloy cost to be updated.
Check against Minimum Order Amount
If the customer order falls below the minimum order amount entered for the customer, a message appears informing you that the order amount falls below the purchase limit entered for the customer. The question Insert a setup price at the end of the order also appears.
Check if part is included in active quote
When registering new order rows in the Register Customer Order and Register Invoices Directly procedures, a check is made to see if the customer and part already are included in an active quote. A message appears if an active quote exists and you can then link to the quote in question. This is determined by the setting Check if part is included in active quote, under Orders / Quotes under the Sales tab in the Settings procedure. The setting is activated by default.
Change Owner of Specific Serial Number when Existing Product Is Sold
If a part with a serial number has been traded in and is then sold to a new customer, a change of owner on the specific serial number can be made. (For example a machine that has been traded in and is sold to a new customer.)
Export Customer Order
You can, from a local copy of MONITOR, create and export customer order bases. This means that e.g. a sales person can register a quote in his local MONITOR system in connection with a visit to customers and then export it via an e-mail message to the office for import to MONITOR. Please read more about this under CRM and SRM in the Using MONITOR Procedures guide.
Blanket Order
On customer orders that concern blanket orders you will find information about the blanket order in question, rest quantity, initial quantity and validity period. The text "Link to blanket order exists" appears in blue at the top of the Rows tab. Read more about blanket orders in the help section for the Register Blanket Order - Sales procedure.
If the order date is changed in the order header, one or several rows can be linked to another blanket order. If so, a message appears.
Printing an Order
To rationalize printing, you can print individual orders directly by using the Print button under the Window functions. The customer order will then be printed on a default form, that must be selected using the setting Type of form used to direct-print orders.
By using the key F9 you can automatically save an order, perform a printout and approve the delivery note. The order will then get status 4 (Delivery note printed).
You can also print orders whenever you want, using the Print Customer Order procedure. That procedure also allows you to print several orders, by order number and customer. There you can also select the form, and preview the order prior to printout.
When printing in the procedure Print Customer Order, the printout can be performed according to the default method. This is done by using the Send or print according to the order setting button.
![]() The status of orders sent via e-mail will not be updated if you failed to logon to the e-mail program Microsoft Outlook or if the e-mail sending was interrupted.
The status of orders sent via e-mail will not be updated if you failed to logon to the e-mail program Microsoft Outlook or if the e-mail sending was interrupted.
Attach XML File when Sending Order Confirmations via E-mail
To customers that also use MONITOR you can attach an order confirmation as an XML file and send the file in an e-mail by using the function Send via e-mail in the Window functions. The default setting is to attach an XML file to the e-mail message along with the PDF file of the order confirmation that is always sent. This is configured under the button Attach XML file under the Info tab in the Update Customer procedure. The customer can then import the XML file from the e-mail message to the procedure window in the Register Purchase Order procedure or to the Procedure menu in order to register the order confirmation. To attach the order confirmation as an XML file and import it to a purchase order by using drag and drop are functions included in the MONITOR-to-MONITOR feature.
![]() The order number is included in the file names of the XML and PDF files that are sent via e-mail. If the order number contains characters invalid for file names (such as slash "/"), these will be replaced with hyphens "-" in the file name.
The order number is included in the file names of the XML and PDF files that are sent via e-mail. If the order number contains characters invalid for file names (such as slash "/"), these will be replaced with hyphens "-" in the file name.
Create Manufacturing Order/Manufacturing Order Suggestion or Purchase Order from Customer Order
You can also configure the system to automatically create manufacturing orders (M-orders) or manufacturing order suggestions (M-order suggestions) for each respective new customer order row that is saved on a customer order (C-order). On manufacturing orders that are created this way, the customer order number is shown straight away. On a customer order row, the manufacturing order number is shown when the manufacturing order is saved.
Under Automatic M-/P-orders from customer order under the Sales tab in the Settings procedure, there are six global settings that decides whether or not a manufacturing order or a manufacturing order suggestion will be created, how the manufacturing order number and project number will be onfigured, if manufacturing order or manufacturing order suggestion from customer order is to be created by default or not, and if a purchase order will be created from a customer order. If the system setting to create manufacturing order, manufacturing order suggestion or purchase order from customer has been configured in the Settings procedure, you can choose whether to apply it for each customer order in this Search Form.
Please Note the following conditions for the above to apply:
Orders Locked from Picking
Any orders for which a pick list for EDI/packaging has been printed, will remain "locked" until the picking has been reported or until they are manually unlocked. When a locked order is loaded, a ![]() message appears.
message appears.
If you select OK in the warning message, you will receive another message indicating that you can only view this order, not make any modifications. Any order rows affected by picking are ![]() highlighted on a locked order with green font in the Delivery period field.
highlighted on a locked order with green font in the Delivery period field.
To unlock the orders on a delivery note you use the Order List - Sales procedure, select the Standard list type and classify by Delivery note number. In this list you right-click to open the ![]() Info menu and select Unlock delivery note and choose All orders or By order.
Info menu and select Unlock delivery note and choose All orders or By order.
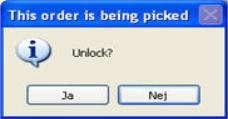
Then the This order is being picked ![]() dialog box appears. Here you select Yes or No.
dialog box appears. Here you select Yes or No.
If you click Yes the ![]() dialog box Unlock! will appear. There you get to answer the question whether or not the list is to be re-loaded.
dialog box Unlock! will appear. There you get to answer the question whether or not the list is to be re-loaded.
![]() Please Note! A delivery note normally contains several different orders. If you release or unlink all the orders it contains, it means that the delivery note number that was assigned will also be deleted.
Please Note! A delivery note normally contains several different orders. If you release or unlink all the orders it contains, it means that the delivery note number that was assigned will also be deleted.
Window Functions
Press F9 to automatically save order, get printout and approval of delivery note in one step. The order will then get status 4 (Delivery note printed).
Split row - creates an almost identical copy of the order row on which the cursor is positioned. However, the quantity will be set to zero on the new row.
Read more about the other Window functions under Window Functions in the MONITOR Basics guide.